PaperCut MF (since version 20.1.0) comes with Data Integrations, a new feature that allows you to export daily usage data from PaperCut MF into various 3rd party tools for graphics, reporting, BI, or accounting systems.
This feature expands our suite of reporting functionality options like inbuilt reports and custom reports .
Why export usage data? So that you can consume, analyze, and view usage trends over time to understand the trends and make informed decisions to further optimize your print fleet.
How to export usage data
You can export usage data by configuring one or both of the following:
- Daily data export - Daily export of your required data.
- Historical data export - Export of needed historical data.
1. Navigate to [PaperCut MF Install Location]\server\lib-ext\data-integrations
2. Either:
- Create a new empty text file with a
.propertiesextension - Make a copy of the
data-integration.properties.templatefile and rename it to a new name with.propertiesextension, for example,intuitivebi.properties
3. Use a text editor to open this new .properties text file and add/edit the following:

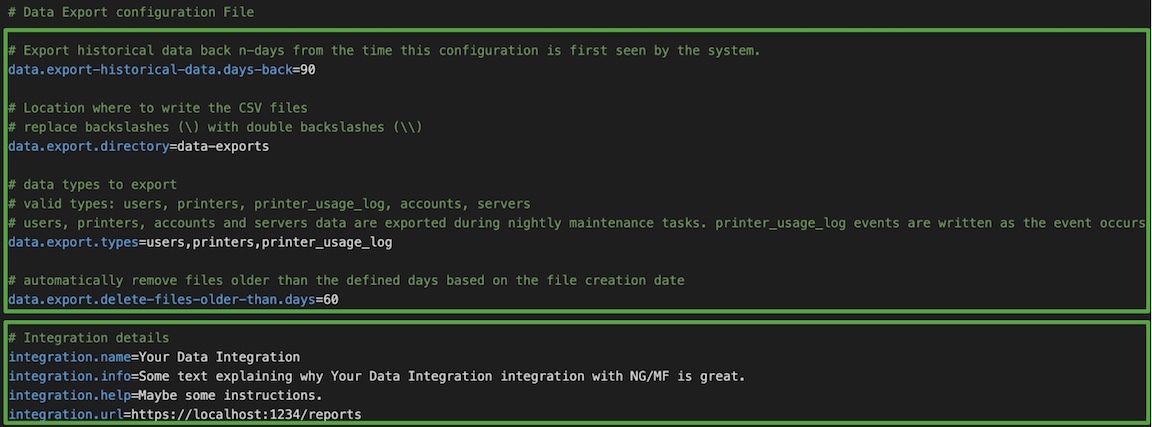
Data Export Configuration from PaperCut MF (top half of screenshot)
Parameter | Description |
|---|---|
| Specify the time period (days before the current date) of historical data being exported. Default = 90 (days before the current date) Note: If this value is significantly higher than the default value (that is, 365 or 1095) and you have a large organization using PaperCut MF, it could increase the time taken to export user changes, printer changes, and daily printing logs data. You can also set the value to 0 to not export historical data and commence exporting daily changes. |
| Specify the location where the exported data is saved. Default: Note: To save the exported data in the default location, leave this blank or do not specify a fully qualified path. In the example shown above, this folder is called data-exports. It gets automatically created by PaperCut MF the first time data is exported. |
| Specify the data types being exported. Accepted values: users, printers, printer_usage_log, accounts, servers. |
| Specify the time period (in days) after which exported data files are automatically purged. Default = 60 (days) |
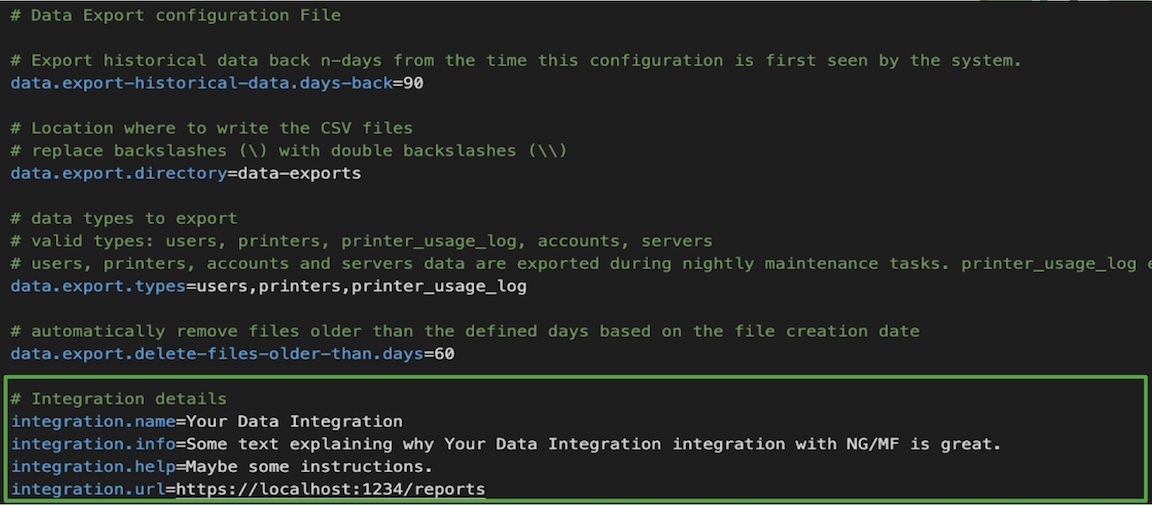
Details of the Data Integration within PaperCut MF (bottom half of screenshot)
Parameter | Description |
|---|---|
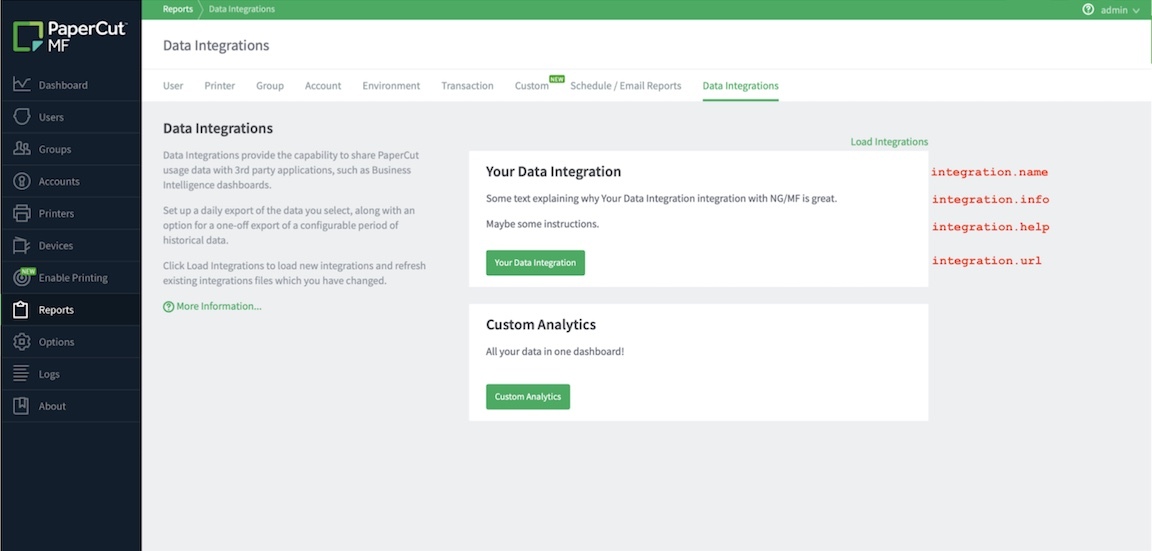
| Specify the name of your integration that will appear as the title on the Integration box displayed on the Data Integrations page. |
| A short sentence to explain what your integration is for—like a three-second elevator pitch. |
| Do you need to provide any helpful steps to use the integration? This is where you provide them. |
| If your integration has a web page to use it, provide the URL here so that a link appears via a button on the PaperCut MF Admin web console. When clicked, the URL will open in a new browser tab. |
Example of how the configuration parameters map to the UI.


4. Save the file
5. Go to PaperCut MF > Reports > Data Integrations and click Load Integrations to load new integrations and refresh existing integrations files that you have changed.
6. Verify your PaperCut MF usage data exported:
- Historical Data Export
- Daily accounts, users, printers, printer_usage_log, servers changes
Structure of the exported data
All data files are exported as Comma Separated Value (CSV) files. The exported CSVs (including historical data export) are exported under the data.export.directory defined in the configuration file above.
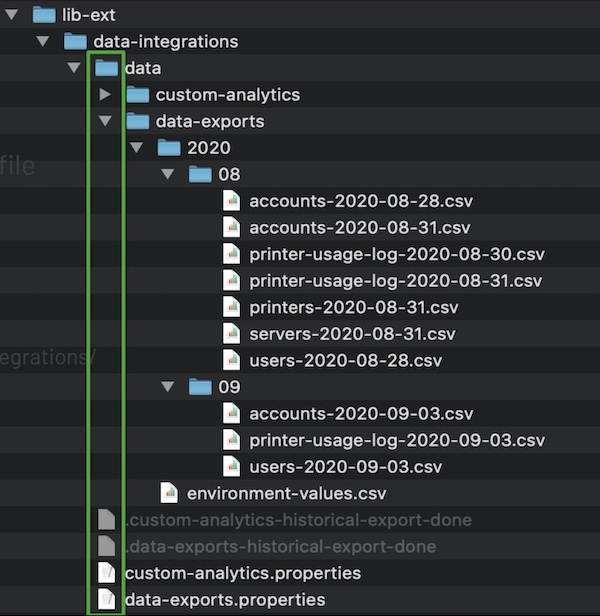
As you can see in the following screenshot, the files are saved into a data-based folder hierarchy mapping to the numerical year and numerical month (for example, January = 01) with a filename format TYPE-YYYY-MM-DD.csv

Some points to remember:
- environment-values.csv contains environment variables defined in PaperCut MF environment config keys. The same file will be overwritten every night in order to support changes to values
- The printers file contains an added column for PRINTER_GROUP which contains a comma-delimited string of group names (if they’re available).
- The printer_usage_log files are exported in real-time.
- Account, user, printer, server, and environment datasets are exported nightly during maintenance (ie yesterday’s data is exported)
FAQ
What if the nightly scheduled task time changes?
There are situations where usage data may export twice in the same day. This scenario would likely only happen if the PaperCut SysAdmin changes the maintenance schedule, causing the maintenance task to run twice on that day. Just in case it does happen, the consumer of our CSV files must be aware of the following:
- Each CSV file might contain the same entity (like a user or printer) multiple times. The consumer needs to check if an insert or update is required on their side.
- As CSV files can be updated, the consumer must re-import files if/when they have been modified. If they just watch out for newly created files, they might miss out on some data.
If the maintenance job does not run on a day (for example, because the server is down), this day’s data will not be exported. The SysAdmin might have to trigger another initial export to fill the gaps.
If either of these situations applies to you, a workaround that could be followed is dropping the data in your 3rd party application database and to change the PaperCut integration properties file to bulk export historical data. Remember to set the data.export-historical-data.days-back parameter and to delete the backup flag file named after your integration, in this example .intuitivebi-historical-export-done.


Comments