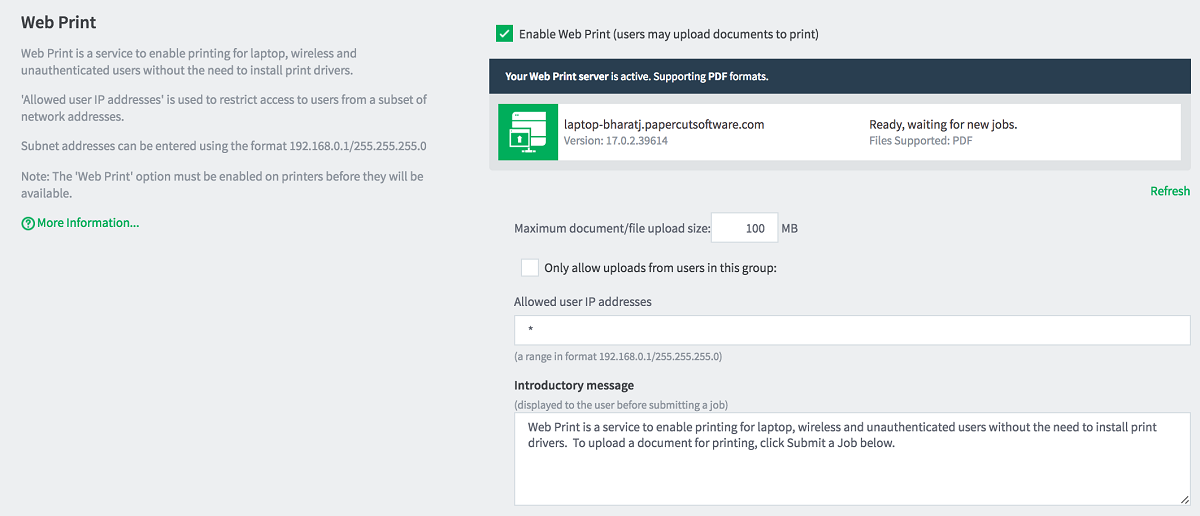
Modify default Web Print system configuration (optional)
The default Web Print configuration options are:
-
Maximum document/file upload size — If a user uploads a document greater than the specified size (in MB), their upload is rejected. The default value is 100MB.
-
Only allow uploads from users in this group — Restrict Web Print access to a particular group of users. When this option is enabled, users not in the specified group do not see the Web Print item in the navigation menu. By deafult, not groups are selected.
-
Allowed user IP addresses — Use this option to restrict Web Print access to a selected IP address range. For example, access might be limited to systems on a wireless network (i.e. force users on the wired network to use standard print queues). Address ranges are entered in the format:
1.2.3.0/255.255.255.0. By default, no IP addresses are selected. -
Introductory message — The message to be displayed on the first page after a user clicks the Web Print menu option. Use this message to explain the service, offer site-specific advice, or other information to assist the user. HTML is supported, e.g. use
<p>tags to start a new paragraph, or an<a>tag to provide a link. The default message is:Web Print is a service to enable printing for laptop, wireless and unauthenticated users without the need to install print drivers. To upload a document for printing, click Submit a Job below.
To change any of these settings:
- Select Enable Printing > Mobile & BYOD.
The Mobile & BYOD page is displayed. - In the Web Print area, update the settings as required.
The Web Print fields are displayed.
- Click Apply.
Modify print options
The print options selected during the Web Print wizard are currently limited to the number of copies to print. Other print options such as grayscale, duplex, paper size etc. are selected based on the default options of the print queue, information here: Windows Printing Defaults and Printing Preferences .
Most organizations configure at least four print queues in conjunction with Secure print release and Find-Me printing and printer load balancing , which include:
- Black and white - Simplex
- Black and white - Duplex
- Color - Simplex
- Color - Duplex
If it is important to provide the user with a print option choice (e.g. when the same printer has trays for Letter and Legal paper), you need to create different print queues each with different default settings e.g. one print queue called Library Printer (Letter) defaulting to the Letter size and tray, and a second print queue (pointing to the same physical printer) called Library Printer (Legal) defaulting to the Legal size and tray.
When running Web Print in Sandbox mode , these printing defaults can be set on the Sandbox server when logged in as the Web Print user you have created by opening up the print queue properties and navigating to General > Preferences…
When running Web Print in Default mode on a Windows server, specifying printing defaults on the print server will only work if the PaperCut Web Print Server service is configured to run as a service account , where you have set the printing preferences specifically for that account. This will require you to login to the print server as that account and open the printer properties, making sure to set the appropriate settings in General > Preferences…. You may then need to restart the PaperCut Print Provider and PaperCut Web Print Server services .
When printing an image file, Web Print rotates and/or scales down the image if needed so that it fits on the page.


Comments