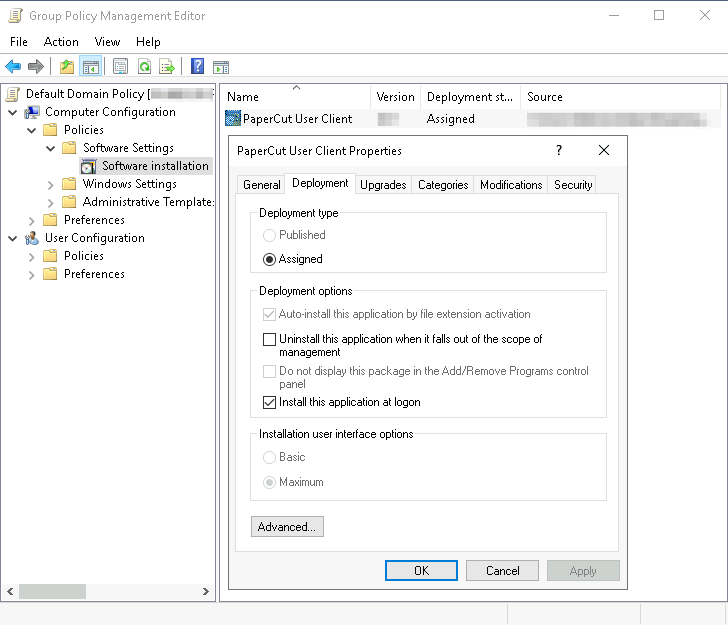
You can deploy the PaperCut NG/MF User Client to workstations using a variety of deployment methods. The deployment options are covered in detail in the [app-path]\client\README.txt file.
Options include:
-
Zero install—Administrators looking for an automated install/deployment option should consider the “zero install” strategy. This is the recommended strategy for most Windows network environments as it’s 100% self-maintaining.
-
Local installation—If you’re after a manual “setup wizard” style installer, run the program
client-local-install.exelocated in the network sharePCClient. You can access this share by typing the following address into Windows Explorer.\\<MyServer>\PCClient\win, whereMyServeris the name of the server where PaperCut NG/MF is installed. -
MSI package—Administrators can also deploy via MSI package, allowing the Client software to be remotely installed via Group Policy. This option is available for advanced sites that already leverage MSI packages for staged software deployment and want to continue with this procedure.
Zero install
The recommended approach with Windows networks is the “zero install” strategy. This involves configuring the workstations via group policy or otherwise, to run the client executable directly off the PCClient share - a share set up during installation. This avoids the need for a separate installation process on each workstation and ensures the client software is automatically updated in conjunction with server updates.
You can run the client directly from the PCClient share setup on the server. Two executables provide this launch functionality:
-
pc-client.exe
-
pc-client-local-cache.exe
pc-client.exe launches the client directly off the network share. The “local-cache” version (pc-client-local-cache.exe), is a smarter version that first copies itself and associated files to the local drive and launches itself from there. The local-cache version has the advantage that any future start ups use the local copy, which minimizes network traffic. The cache is self-managing and kept up-to-date ensuring that any new versions of the client are automatically and transparently copied down to the client.
Using pc-client-local-cache.exe is recommended on large networks. It does, however, require a globally writable cache directory. By default, the cache is created in a directory on the system drive (normally C:\Cache). You can specify an alternate cache with the --cache command-line switch. Administrators should ensure that standard users have write access to the system drive, or manually create the cache directory if required.
The recommended way to launch the pc-client-local-cache.exe on start up is to add a line to your domain login script:
cmd /c "start \\servername\PCClient\win\pc-client-local-cache.exe --silent"
See below for other automatic start options.
Local installation
The zero-install deployment option is not appropriate for all situations. A local install is recommend on Windows laptop systems that are not permanently connected to the network or centrally managed by network administrators. The client-local-install.exe program can assist end users with a standard “setup wizard” install process. You can also streamline/automate this installer by using command-line options. For more information, see
Automate installation on Windows
.
Deployment on Windows via silent installer MSI
The User Client software is available as a silent-install MSI (no clicks or wizards). This option is available for advanced sites that already leverage MSI packages for automated software deployment and upgrades using Active Directory Group Policy options. We recommend using the pc-client-local-cache.exe version of the User Client for most deployments, as all updates are automatically pushed to client machines. The MSI option discussed here must be manually updated.
The MSI package is a great option for organizations managing staged rollouts via Group Policy Filters. It is common in large organizations to progressively roll out new software as a series of small steps, for example, the IT department might get the software first, followed by a roll out across the organization.
Step 1 - Copy User Client files to deployment location
Copy all User Client files and subdirectories from
\\servername\PCClient\win\
into a versioned folder on your domain, alongside your other MSI-deployed software, e.g.
\\DeployedSoftware\papercut-client-21.2\
Do not deploy the MSI directly from the PaperCut install directory because the contents of this directory change when PaperCut is upgraded. This can result in problems in your MSI deployments.
Step 2 - Configure the User Client
If you need to make adjustments to the client (such as modifying config.properties or adding a custom logo), now’s the time to do so. Changes made are distributed to your domain as the MSI deploys.
Step 3 - Deploy the MSI
Deploy the pc-client-admin-deploy.msi to your domain, as a Software Installation component to a Group Policy Object. The procedure for MSI deployment via Group Policy is explained in Microsoft’s Knowledge Base:
http://support.microsoft.com/kb/816102
.

Step 4 - Configure for auto launch
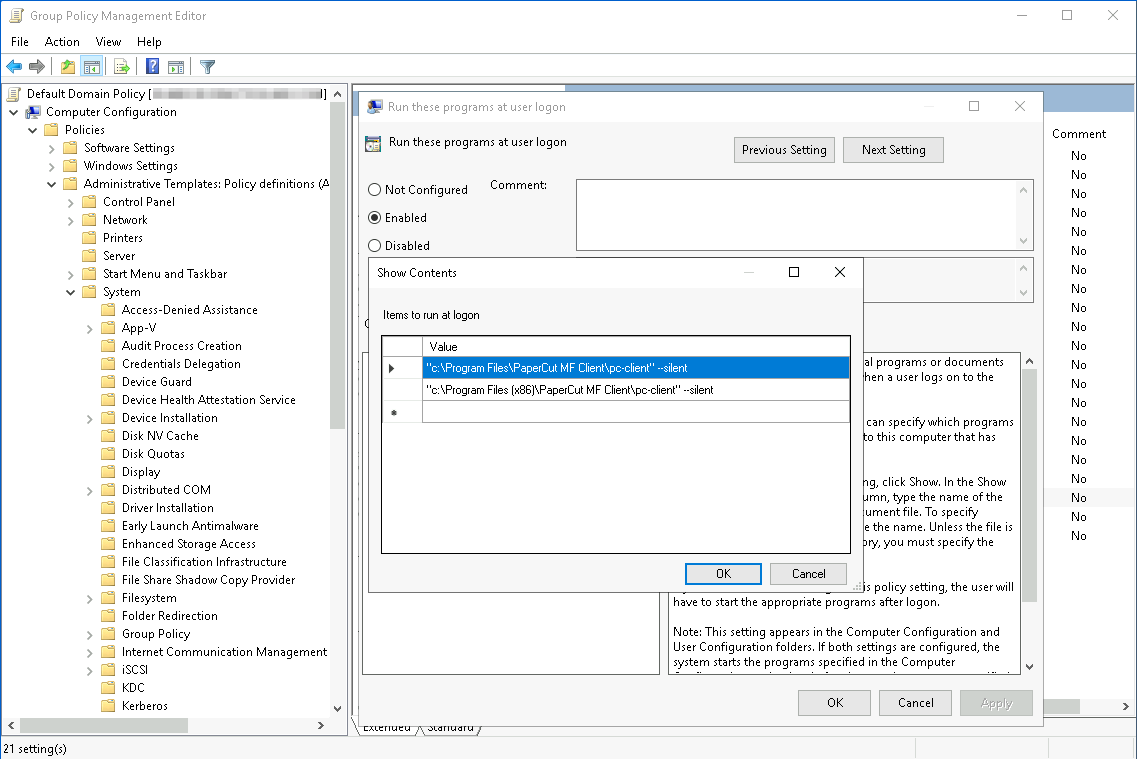
Configure pc-client.exe to launch automatically at startup, as you would for any other program. One option is to add the User Client application to your GPO’s "Run these programs at user logon" setting, found under Computer/User Configuration > Policies > Administrative Templates > System > Logon

An alternate option is to start the client from an existing user logon script. An example of the line to add to the logon script is:
cmd /c "start "C:\Program Files\PaperCut NG/MF Client\pc-client.exe --silent"
Prerequisites/troubleshooting
Older machines might require an upgrade to the Windows Installer Service. If so, the following error message is displayed:
"This installation package cannot be installed by the Windows Installer Service. You must install a Windows service pack that contains a newer version of the Windows Installer Package"
To resolve this, download and install the Windows Installer 4.5 Redistributable, from: http://www.microsoft.com/en-us/download/details.aspx?id=8483
For more information on alternate deployment options see the [app-path]\client\README.txt file.
Upgrade an MSI installation
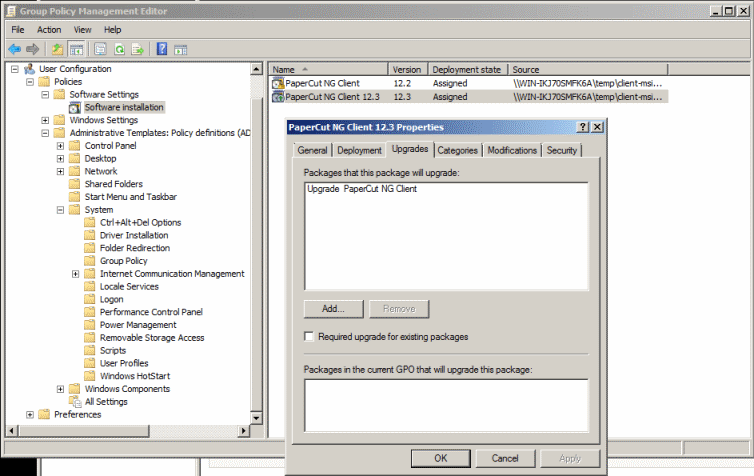
The procedure for upgrading an already deployed installation of the client (e.g. from 12.3 to 12.4) is slightly different to that of the initial deployment - add the updated MSI packages to your original GPO as an upgrade item. For step-by-step instructions on the procedure, see Microsoft’s Upgrade Guide at: http://technet.microsoft.com/en-us/library/cc783421%28v=ws.10%29.aspx
Do not replace an old MSI with a newer version. If after following the instructions in the Microsoft article above you’re still unsure how to proceed, please seek assistance, or contact technical support.

Windows 8 Metro requirements
Windows 8 introduced a new user interface called Metro. It has a tile based start screen or runs one application at a time. This user interface is also known as the “Windows 8-style UI”.
When the Windows 8 user interface is in Metro mode, Windows desktop applications are not visible. This includes notifications, such as the PaperCut Client popup. Therefore, the Client popup could be missed.
PaperCut uses a Toast notification to notify users in Metro mode that a notification requires their attention in Metro mode.

With the Toast notification, users working in Metro mode are notified of all PaperCut activities that require their attention in Desktop mode.


Comments