This section describes various usage scenarios discussing why and how to use a hold/release queue. They provide a good starting point for your own implementations.
-
Override/change account selection using Admin web interface Release Station
-
Cancel jobs without accounts using Admin web interface Release Station
Saving paper and toner
A large source of wasted paper in organizations are documents that were never collected from the printer. Some of these uncollected documents are caused by accidental printing, and others were just forgotten. But the majority of these documents end up in the bin.
If the document is not printed until a user walks to the printer to collect it, then this source of waste can be mostly eliminated.
To implement a Release Station to save paper:
-
Set up a low-end workstation near the printer(s).
-
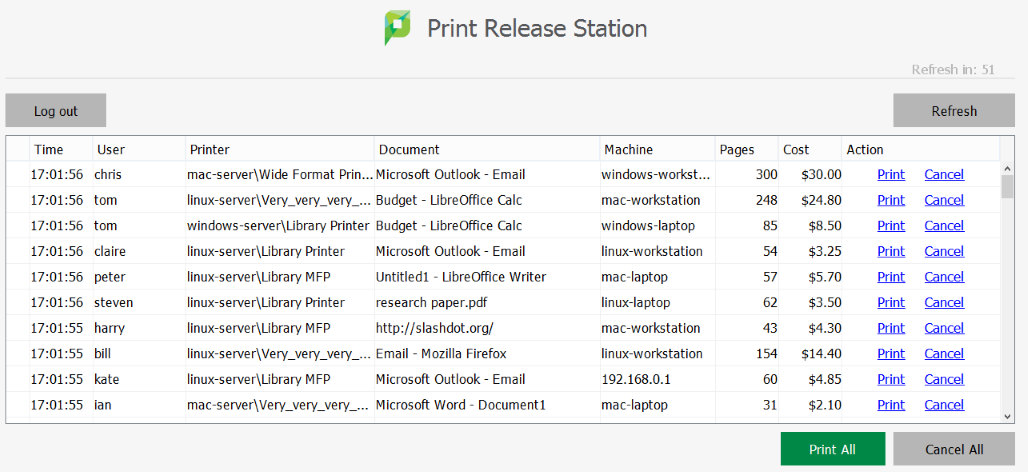
Run the Standard Release Station in the default mode (Release Any mode). For more information, see Release Station Modes .
-
In PaperCut NG/MF, enable the printer(s) for Release Station use. For more information, see Enabling hold/release support on a printer .
-
To allow users to release jobs via the User web interface Release Station, also enable Release Any mode for the web tools interface. For more information, see End-User Web Based Release Interface Configuration .
Secure printing
When users print documents that contain sensitive information, it is important that no one else picks up the document from the printer. Even when the printers are close-by, people can accidentally leave sensitive documents on the printer. Use print Release Stations to implement Secure Printing, which ensures that a document can only be released by the person who printed it and only when that person is standing near the printers.
Secure printing is implemented as follows:
-
Setup a low-end workstation near the printer(s).
-
Run the Standard Release Station in “Secure” mode. For more information, see Release Station modes .
-
In PaperCut NG/MF, enable the printer(s) for Release Station use. For more information, see Enabling hold/release support on a printer .
-
Mobile Print Release—releasing print jobs using your mobile device for secure printing without dedicated hardware.
Secure printing requires users to be authenticated on the network when printing (i.e. an Active Directory domain). This allows the Release Station to enforce the secure printing so that users can only release documents they print.
Pay per print (e.g. library or Internet cafe)
Libraries and Internet cafes usually only allow printing once a user has paid for the cost of the printed document.Implementing pay-per-print can often involved deploying expensive card-based payment solutions, however, PaperCut NG/MF Release Stations allow this to be implemented in a more cost effective way.
An example of how print Release Stations would be used in this scenario is:
-
Users print documents from a workstation without any assistance from staff.
-
The printed documents are held in the queue until released by a staff member.
-
The user goes to the staff desk and asks for the document to be released.
-
The staff member opens a Release Station (the program or a web page), finds the user’s job, notes the cost and collects the payment from the user.
-
The staff member clicks Print, allowing the job to be printed.
-
The user then collects the printed document from the printer.
If the user does not pay for a print, then the print job is automatically deleted without any staff interaction.
To implement a pay-per-print hold/release queue:
-
In PaperCut NG/MF, enable the hold/release option on the printer(s). For more information, see Enabling hold/release support on a printer .
-
In PaperCut NG/MF, setup the staff to be a “hold/release queue manager”. This allows them to log in to the “manager mode” Release Stations. For more information, see Hold/release queue managers .
-
On the staff desk workstations, run the Release Station in “Manager mode”. For more information, see Release Station modes .
-
There are two release interfaces:
-
Standard Release Station in “Manager mode” - requires minimal setup.
-
Web-based release interface - requires only a web browser.
-
Expensive printers (approved printing)
At times it is necessary to restrict access to an expensive printer (like a color laser printer), or other printer that should be used only with an administrator’s permission. Instead of locking the printer away where no one has access to it; you can configure the printer so that only administrators or hold/release managers can release print jobs. In this situation:
-
The user prints the document to the restricted printer.
-
The document is held in the queue awaiting approval by an authorized person.
-
The user talks to the administrator (or approved user) who would decide whether the user is allowed to perform the print.
-
The administrator logs into the web-based release interface from any machine on the network, and “Release” or “Cancel” the job as appropriate.
To implement admin/manager only release interface:
-
In PaperCut NG/MF, enable the hold/release mode on the printer(s); then select the Admin/Manager only release mode. For more information, see Enabling hold/release support on a printer .
-
You do not need to set up a dedicated Release Station near the printer, because the web-based release interface can be used from any machine on the network.
-
It is also a good idea to put a notice on the printer that tells users how to have their documents released.
Delegated Print Release
You can allow a user to release jobs printed by other users. This is called Delegated Print Release. An example scenario is when a teacher needs to view and release jobs printed by their students. If you make each teacher a hold/release queue manager, they can view and release any job, including other teachers’ jobs. By using Delegated Print Release, teachers can view and release only the print jobs they need to manage.
In this situation:
-
A student prints a document.
-
The document is held in the queue awaiting approval by a teacher.
-
The student talks to their teacher who will decide whether the document should be allowed to print.
-
The teacher logs into their User web-interface Release Station from any machine on the network and releases or cancels the job as appropriate.
To implement delegated print release:
-
In PaperCut NG/MF, enable the hold/release option on the printer(s). For more information, see Enabling hold/release support on a printer .
-
Select the teacher’s account on the User List page.
-
In the Advanced Options area, select the Allow this user to release jobs printed by others (Delegated print release) check box.
-
Enter a list of student usernames delegating print release to the teacher. Alternatively enter an existing group name under Groups. For example, if all students belong to “students” group, you can enter “students”.
-
Click Apply.
Now this teacher can release delegated jobs via the User web interface Release Station.
-
To apply this setting to multiple teachers, use Bulk User Actions link under Users tab. For more information, see Bulk user operations
To prevent students from viewing/releasing their own jobs, only allow group “teachers” to view held jobs:
-
Click the Options tab. The General page is displayed.
-
In the User Features area, select the Allow users to view held jobs (hold/release queues) via end user interface check box.
-
Select the Only allow users in this group to view held jobs check box.
-
Set the group name to “teachers”.
-
Click Apply.
Override/change account selection using Admin web interface Release Station
Many educational organizations want to charge for printing, which means that some users might not be able to print because of a low balance. This means that the print job waits in the Secure hold/release queue until it is either canceled, times out, or the user obtains sufficient credit to release the job.
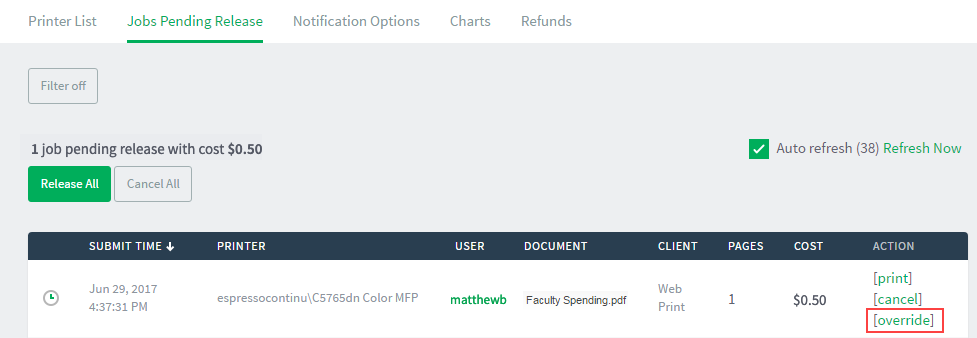
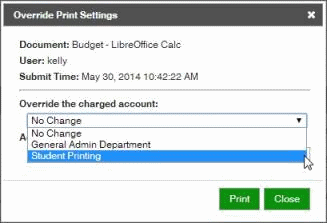
A hold/release queue manager (for more information, see Hold/release queue managers ) can use the Admin web interface Release Station to override the selected account (shared account or personal balance) and charge the print job to a specific shared account, moving the cost of the print job from the selected shared account or user’s personal balance to a shared account that the hold/release queue manager has access to.
In this situation:
-
A student prints a document.
-
The document is held in the queue awaiting additional funds.
-
The student talks to their teacher who will decide whether the document is allowed to print.
-
The teacher logs into their User web interface Release Station from any machine on the network and selects the [override] action for the job.
-
The teacher then selects a shared account to charge the job to, optionally enters a job comment; then clicks Print.


To implement Override Print Settings to charge to a shared account:
-
In PaperCut NG/MF, enable the hold/release option on the printer(s). For more information, see Enabling hold/release support on a printer .
-
On the User List page, select the teacher’s account .
-
Click the Accounts tab.
The Shared Account List page is displayed. -
In the Actions menu, click Create a new account.
The Account Details page is displayed. -
Give the shared account a name. Determine if this is to be a restricted shared account (e.g. cannot have a negative balance, limiting the amount of use) or if it is unrestricted and allowed to accrue a negative balance.
-
Click Apply.
-
Click the Security tab.
-
In the Users area, select the teacher’s user account; then click Add.
This teacher can now override jobs using the Admin web interface.
Cancel jobs without accounts using Admin web interface Release Station
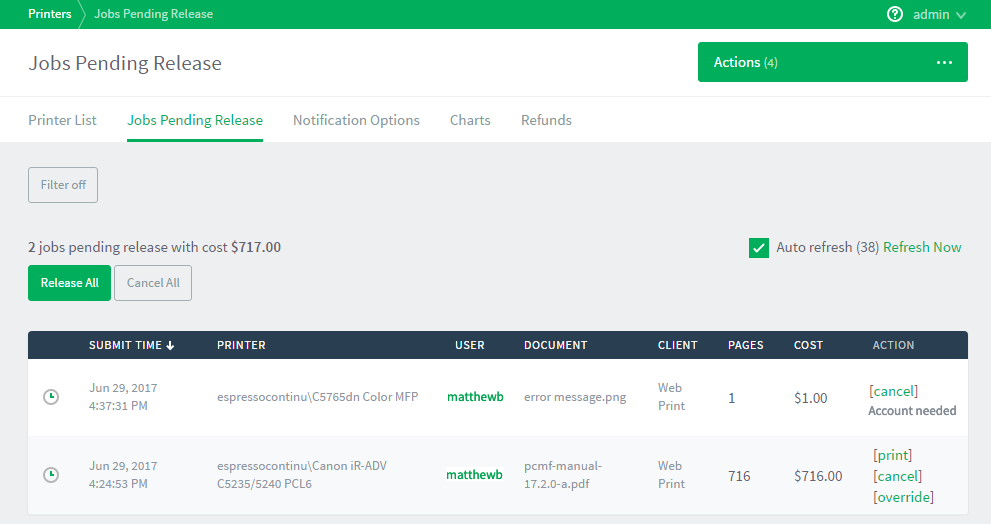
Since PaperCut MF 19.0.0 and above allows users to send print jobs with or without an account, directly to the printing device, there could be a mix of held print jobs at the device (jobs with and without accounts). Such jobs can be released/ printed only after they have an account to charge to. This means that the print job waits in the Secure hold/release queue until it is canceled, times out, or the job is associated with an account to charge to. A hold/release queue manager (for more information, see Hold/release queue managers ) can use the Admin web interface Release Station to cancel the job.
In this situation:
-
A student prints a document, but does not assign an account.
-
The document is held in the queue awaiting an account.
-
The teacher logs into the Admin web interface Release Station from any machine on the network and selects the [cancel] action for the job.

Unauthenticated printing
In some environments it is not possible (or very difficult) to have users authenticated when printing. This could be due to a technology constraint (like using Macs in mainly Windows environment) or could be for convenience (like having kiosk computers in the library that people can use without logging in).
In these scenarios, print jobs are printed under one name, but charging is allocated to another. For example, a job is printed by a generic “library user”, but you need to charge to the user’s real account. In order to charge the correct user for printing, PaperCut NG/MF needs to identify the user to charge. You can achieved this using a Release Station in “Release Any” mode.
This works as follows:
-
The user prints from a workstation but is not authenticated, so jobs are allocated to a generic user.
-
The print job is held in the queue awaiting release.
-
The user walks to the Release Station and enters a username and password. Alternatively the user can log in to the PaperCut NG/MF User interface; then select Jobs Pending Release.
-
All jobs held are listed. Jobs can be identified by document name or workstation machine name.
-
The user selects his or her jobs. Any jobs released are charged to that user’s account.

To implement unauthenticated printing using a Release Station:
-
Set up a low-end workstation near the printer(s).
-
Run the Standard Release Station in “Release Any” mode. For more information, see Release Station modes .
-
In PaperCut NG/MF, enable the printer(s) for Release Station use; then select User release mode. For more information, see Enabling hold/release support on a printer .
-
To allow users to release jobs via the User web interface Release Station, also enable Release Any mode for the web tools interface. For more information, see End-user web based release interface configuration .
To implement unauthenticated printing using the browser interface:
-
In PaperCut NG/MF, select the Hold/Release mode on the appropriate printer(s). For more information, see Enabling hold/release support on a printer .
-
Ensure end users have the ability to view held jobs and can release any job (charging to their account). For more information, see End-user web based release interface configuration .


Comments