 I was recently helping a customer with a couple of reporting questions they had and they mentioned that they were going to be rolling out 20 new printers in the near future. I commented that this would require quite a bit of work, lugging hardware around, changing printer drivers etc. They agreed and then said that the worst of it was setting the static IP addresses of all of the new devices.
Having had to manage rollouts of small to large sizes I’ve come across this problem before and luckily found two features of a Microsoft DHCP server that can save a lot of time.
DHCP Reservations
Ultimately there is no difference between a static IP address and a DHCP allocated IP address that doesn’t change. The results are the same, you connect to the IP address and the same device is there each and every time.
This is essential for servers, switches, routers, printers and more. In many cases setting the device to use a static IP address is suitable and possibly even best practice (routers in large networks for example).
However, if you have a large number of devices that require non-changing IP addresses, why not set your DHCP server to always give out the same IP address each time the device turns on or refreshes its IP address?
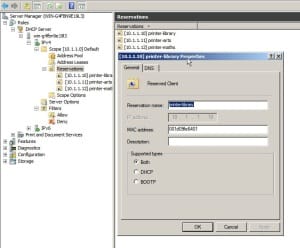
Simply open your DHCP management interface (I’ll assume Windows here) and navigate to your Scope and then Reservations. From here you can create new reservations and all you will need is the MAC address from the printer. For example: 00:1D:09:FE:64:04 is converted to 001D09FE6404 and given then IP address of 10.1.1.12. Set the printer to DHCP assigned address and give it a moment.
A couple of seconds later you should be able to communicate with the printer on the new IP address.
The benefits of this are quite easy to see, imagine if you had to send a printer to a remote office where there are no tech-savvy users. Grab the MAC address of the printer, create a new DHCP reservation, create the new print queue and share it out. When the printer gets out there, simply get someone to plug it in to power and network and you’re done.
If you replace the device (hardware does fail unfortunately), simply change the MAC address in the reservation then replace the old hardware. No fiddling with the interface panel on the printer required.
DHCP import/export
“That’s nice.” I hear you say, “But it doesn’t help with these 20 devices, I’m at the printer anyway, might as well do the time there.”
This is quite valid, except you can export/import DHCP settings via the command line enabling you to use your favourite spreadsheet program to manipulate the data.
Running the following command will give you a simple dump of the existing DHCP setup.
netsh dhcp server 192.168.0.1 dump > C:\Dhcp\Dhcpcfg.dmp
Inside you will see commands like:
dhcp server \\10.1.1.1 scope 10.1.1.0 add reservedip 10.1.1.12 001D09FE6404 “printer-library” "" “BOTH”
By adding “netsh " to the start of those lines, you have a pre formatted script to add DHCP configuration settings.
Congratulations! You’ve now set a reserved IP.
If you wanted to get creative, you could export your existing DHCP reservations, load the file into Microsoft Excel, modify the MAC addresses for the relevant devices and re-import it to your DHCP server. 30 seconds per printer by this method, or several minutes standing at the print queue.
Remember, this is just for printing, there is no reason you can’t use this for new servers, printers, switches, access points, specialized desktops and more.
For more netsh DHCP commands see Microsoft’s TechNet website .
For more information in general about netsh commands see Microsoft’s Help and Support website
Hope this post is useful. Best-practice printer management on a large sites not just about PaperCut. It’s also about your network management practices!


