… or “The end-to-end guide on setting up Find-Me Printing with PaperCut MF”
This article demonstrates how to set up Find-Me Printing with PaperCut MF, the edition of PaperCut that allows you to track and control your MFDs / copiers running the PaperCut embedded application.
This article includes a quick video showing you how to set up Find-Me printing, as well as written step by step instructions for a PaperCut MF environment with multiple MFDs.
Find-Me Printing Setup Video
1. Create and test the Print Queues on the server
The first step is to log onto your print server and create print queues for each of printers and copiers in question and then fully test printing on them to make sure they function as expected. Chances are, you already have a print server where these are set up. So long as PaperCut is installed on this print server these printers will appear in the admin interface.
The next step will be to create the Virtual Print Queue, also known as a Find-Me Print Queue, on the same server.
2. Create the Find-Me Queue on the server
Once the print queues are working and being tracked by PaperCut we need to create an additional print queue, this will be the Virtual Queue used for Find-Me printing. This new queue is created exactly the same way as the regular print queues and should be tested that it is working as intended before proceeding with making the queue virtual. In example we call our Find-Me virtual print queue Windows Konica Virtual Queue.
- Log into your Windows Print server, click on the Start button, type
printmanagement.mscand hit the enter key to open the Print Management Console. - Select Printers, click Action, and then choose Add Printer… to launch the Network Printer Installation Wizard.
- Select Create a new port and add a new printer.
- Then enter a Port Name of
nuland click OK. (Yes, you read that right .) - Choose a driver for your Find-Me print queue and click Next.
- Pick a name for your Find-Me Print queue and click Next.
- Confirm the details and click Next to create your Find-Me Printer on your print server.
The next section will walk you through logging into PaperCut to configure Find-Me Printing.
3. Configure the Find-Me Queue in PaperCut
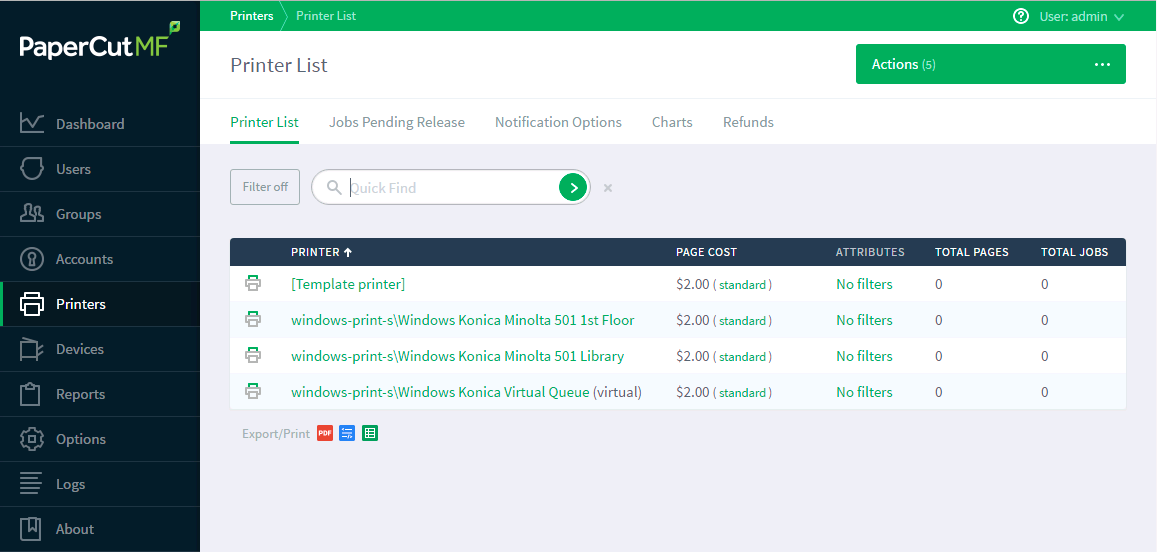
Next login to the PaperCut MF admin interface and go to the Printers tab. You should see the two print queues for the MFDs and an extra queue that will be a virtual queue.
For this example our three print queues are called:
Windows Konica Minolta 501 LibraryWindows Konica Minolta 501 1st FloorWindows Konica Virtual Queue
This is how they look in the PaperCut Admin interface:

Select the print queue you wish to be the virtual queue, in this example it is Windows Konica Virtual Queue. This is the print queue everyone in your organisation will print to. It is important to give it a sensible name when sharing it so end users do not become confused.
a. Navigate to Printers → [name of your find-me queue] → Summary in the PaperCut administration interface. Change the Queue type option to This is a virtual queue (jobs will be redirected to a different queue) as per this screenshot:

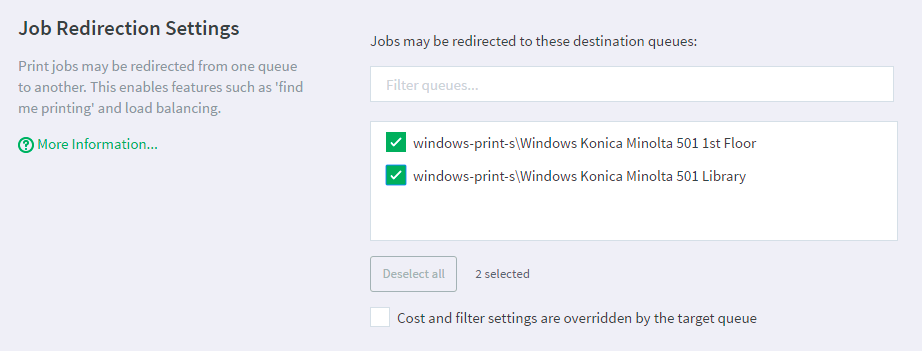
b. Once the queue is setup as a virtual queue a new option box appears allowing you to select the print queues print jobs will be forwarded to. This is where you select the normal print queues associated with the devices in the Find-Me setup. The screen shot shows both destination queues selected as queues the virtual can forward print jobs to:

c. Navigate to Printers → [name of your find-me queue] → Summary → Hold/Release Queue Settings:
- Check the box Enable hold/release queue
- Set the dropdown Release mode to User release (the default). This ensures that jobs are held in the virtual queue and not automatically forwarded to one of the destination queues.
This is what the print queues look like now one of them is setup to be a virtual queue; notice the “(virtual)” after the virtual print queue’s name:

So to go over what we have done here:
- Created and tested print queues for each MFD in the find-me environment
- Created a new print queue and configured it to be a virtual queue within PaperCut MF
- Selected the print queues associated with the MFDs as the destination queues the virtual queue is allowed to forward print jobs to.
The following shows the example virtual queue setup in PaperCut MF:

Using the above settings means that users will print to one print queue (the virtual print queue), the jobs will be held in the print queue, and then when released they will be moved over to the destination print queues associated with the physical device or copier that the user is releasing them from (the MFD).
Now that we have everyone printing to our virtual Find-Me queue and our jobs being paused for hold/release, we need a way to release those print jobs…
4. Configure the Device in PaperCut
The next step is to configure our Konica MFDs to look for print jobs on the virtual queues and then release them on the MFD the user is logged into. In this example we will assume that the PaperCut MF embedded software is already installed and up and running on the Konicas.
Navigate to the Devices tab in the PaperCut MF administration console and select one of the Konica MFDs. In this example we will be configuring the Library Konica MFD first.
To configure the Library machine to view print jobs from the virtual queue and release them on the Library machine you need to:
- Navigate to Devices → [name of your library device] → Summary, then scroll down to the Print Release section and select Enable print release.
- Under This device will display jobs for release from the selected source queues: select the virtual queue. If the print queue configuration steps have been followed, the virtual queue should appear neatly under a
Virtual with Hold/Releaseheading; this makes it easy to find print queues which are configured validly for Find-Me printing. When a user authenticates at the MFD the machine will display the users jobs sitting paused in the selected virtual queue:
- Check the Enable find me printing support selection box:

- On the When released, jobs will be redirected to: drop down choose This device (single queue) (the default)
- On the Select the destination queue: drop down choose the print queue associated with the device. Where possible, PaperCut MF will recommend print queues which appear to match the device under a
Suggestedheading. For this example, the match is with theWindows Konica Minolta 501 Libraryqueue:
The Find-Me workflow - in simple terms.
- A user will print to the virtual queue (they will just see it as a normal print queue)
- The job will be held in the queue
- The user will login to the MFD
- The MFD will look at the virtual queue for any print jobs for that user
- User selects a print job (or all of them)
- Print jobs will be printed from the MFD they are logged into.
How it all looks:

5. Configure additional devices
In this example we have two MFDs, one Library (already setup) and the other is on the 1st floor. We would configure the 1st floor MFD much the same, e.g. set it to look at the virtual queue, but tell it to release on the Windows Konica Minolta 501 1st Floor print queue, which should be Suggested by PaperCut MF based on the detected relationship between the matching print queue and device. This would give us a working Find-Me setup, wherein users can print to one central virtual queue, and release from any of the available MFDs.
Keywords: secure printing , secure print release , find-me printing , findme , mf-only


Comments