New software to manage printing costs has been installed on the network. The system allows the college to track printing expenses according to the individual, faculty or department. To allow effective printing, make sure you understand the following points:
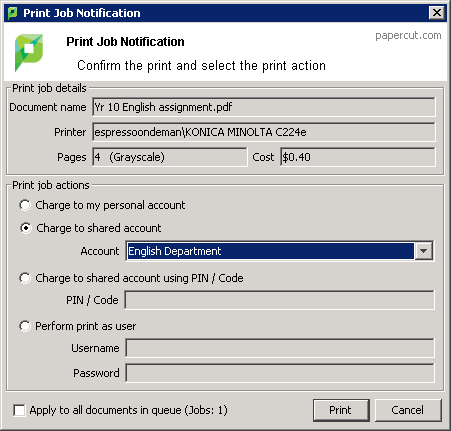
Shared account selection popup window
After sending a print job, a popup dialog is displayed asking you to confirm the details. The print job can be charged to your personal account (using your personal printing balance), or to a shared account (a faculty, using the faculty budget). After choosing an account to charge, click Print to confirm the job and agree to the cost. Otherwise, click Cancel if you no longer want to print the job.
Select your personal account when printing non-faculty related documents. For example:
Printing your personal bank or phone statement.
Occasional personal use of a photo printer.
Select a shared account for faculty printing. For example:
Student handouts.
Student reports.
Course syllabus.
Class lists.
Selecting the right faculty account from the list is important. Different staff members need access to different faculty accounts. If an account that you require is missing from the list, please contact the SysAdmin. Note that the use of faculty accounts is monitored and faculty heads are provided with printing reports.

Resolving problems
If the popup window is not displayed or the icon is missing from your system tray, the print control system is not active and printing is denied. Try restarting your system, or contact the network administrator if problems continue.
![]()
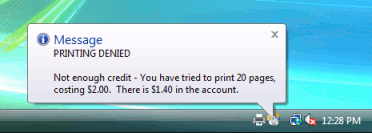
Printing denied message
If you do not have enough printing balance for a job, a Printing Denied message is displayed, and your document will not be printed.

Apply to all documents in queue
This option is displayed at the bottom of both the standard and advanced account selection. When checked, the settings being applied to the current print job are applied to all waiting jobs automatically. The text lets you know how many jobs this affects (e.g. “Jobs: 5”).
This setting is useful when printing a batch of documents for the same purpose. For example, when printing a letter, diagram and spreadsheet for a client, the client account can be selected on the account selection popup along with any other appropriate settings, and the settings are applied to all three jobs. This saves the time taken to apply the settings for each job.


Comments