Before you start
Make sure you understand the two archive disk management options: Keep scan job for up to, and Stop if free space falls below.
The Size management defaults are set to:
- Keep jobs for up to: 30 days
- Stop if free space falls below: 2000 MB
Keep scan job for up to
This option determines the number of days a scan job is kept in the archive. The default value is 30 days, with a minimum value of 1.
If you plan on setting a high value, make sure you consider consumption of drive storage. Monitor disk space growth during the first full week of usage and use this as a basis to extrapolate your storage requirements. For reference, the default archive path is [app-path]/server/data/archive-scan on the primary PaperCut server. You can always change the archive location.
Any change to the Keep jobs for up to: X days option is applied when archive maintenance is performed overnight.
Stop if free space falls below
This is an emergency stop option. If free disk space falls below the set value, all archiving is immediately suspended. This ensures a growing archive will not take down a production server. The default value is 2 GB.
If the server runs other production software, you might want to increase this value.
If email notifications are configured (see Configure email ), administrators will automatically receive an error email alert when disk space drops to this limit..
Step 1: Enable and configure Scan Archiving
- In the admin interface, click the Options tab. The General page is displayed.
- Scroll down to the Scan Archiving area, select the Enable Scan Archiving checkbox.

- Under Size management, either keep the default values, or change how long you want jobs kept for and/or the free space limit before which archiving stops.
- Scroll to the bottom of the page and click Apply.
Step 2: Turn on “track & control scanning” on the device
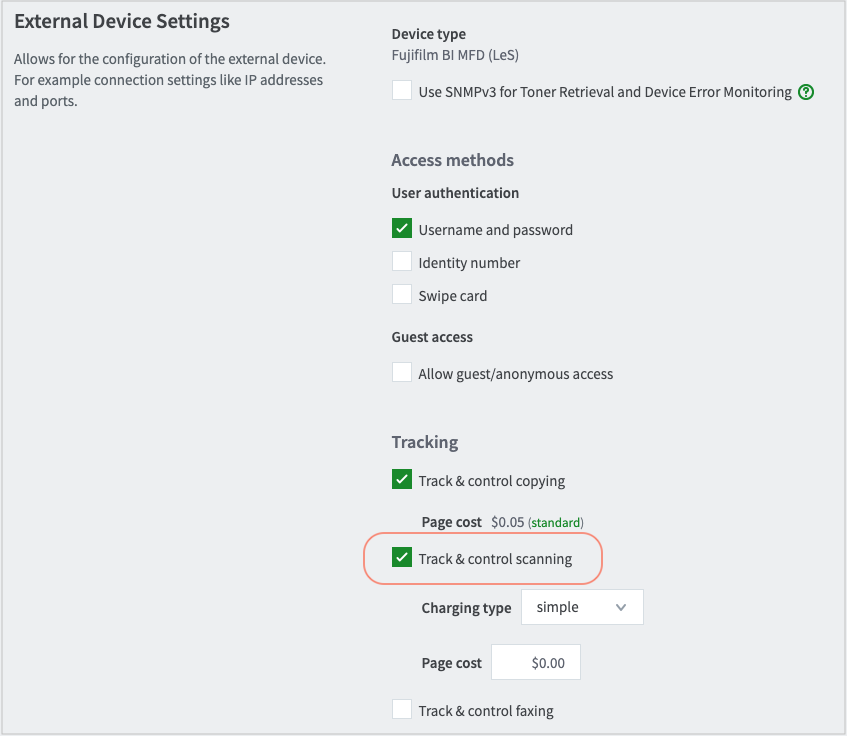
Scan archiving won’t work until you turn it on for the applicable device (MFD).
-
Go to Devices > External Device List tab and select the device you want to track scanning on. The Summary tab is displayed.
-
In the External Device Settings area, under Tracking, select Track & control scanning.

-
Scroll to the bottom of the page and click Apply.
Disable Scan Archiving for selected devices, scan actions, users, or groups
Once enabled, Scan Archiving works only on devices with Track & control scanning turned on.
You can, however, selectively disable archiving at a device, scan action, user, and group level. This can be useful, for example, for human resource managers who routinely scan sensitive information.
Disable Scan Archiving on a specific device
- Click the Devices tab. The External Device List page is displayed.
- Select a device. The Device Details page is displayed showing the Summary tab contents.
- In the Integrated Scanning area, select the Don’t archive this device’s scan jobs checkbox.
- Click OK.

Disable Scan Archiving for a specific scan action
- Click the Devices tab. The External Device List page is displayed.
- Select the Scan Action tab. The configured scan actions are displayed.
- Select a scan action. The Scan Action details page is displayed showing the details tab contents.
- In the Advanced area, select the Don’t archive this scan actions jobs checkbox.
- Click OK.

Disable Scan Archiving for a specific user
- Click the Users tab. The User List page is displayed.
- Select a user. The User Details page is displayed.
- In the Advanced Options area, select the Override printer/device settings checkbox.
- Select the Don’t archive this user’s scan jobs checkbox.
- Click OK.

Disable Scan Archiving for a group of users
- Click the Groups tab. The Group List page is displayed.
- In the Actions menu, click Other bulk user actions. The Bulk User Operations page is displayed.
- Select the group to perform the change on.
- In the Change settings area, select the Change advanced user settings checkbox.
- Select the Override printer/device settings checkbox.
- Select the Don’t archive this user’s scan jobs checkbox.
- Click OK.


Comments