Depending on the method you’ve chosen to determine the user’s identity , users might be presented with a one-off user login popup for authentication.
It’s pretty much a stock standard, boring popup, ready for you to customize with your branding and text so it fits in nicely with your company’s branding and writing style.
For more information about customization, take a look at Customization in the PaperCut NG/MF Manual.
Customize branding
Create a folder named
brandswhere:install locationis where PaperCut NG/MF is installed on the serverOSis the operating system of your PaperCut server.
install location\providers\print-deploy\OS\data\brandsSave a copy of the company logo in the folder. The logo must be:
- .png format
- 150 x 82 pixels
- named
auth-dialog-logo.png
Restart Print Deploy for changes to take effect.
Customize text
In the /data/translations/custom folder, create a JSON file for your language. For example, selfservice-en-US.json (English US), selfservice-es.json (Spanish), or selfservice-fr.json (French), etc.
Add the following config keys in the file:
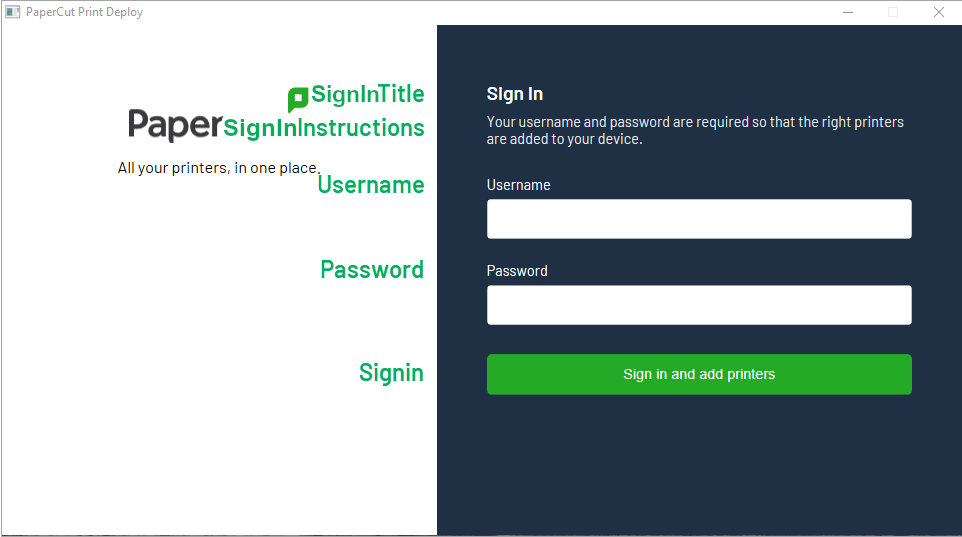
| Config value | |
|---|---|
| SignInTitle | Title at the top of the login popup |
| SignInInstructions | Login text instructions |
| Username | User name text box label |
| Password | Password text box label |
| SignIn | Signin button text |
As an example, you can copy this text and save it as a JSON file:
{
"SignInTitle": "Username and password",
"SignInInstructions": "Your username and password are required so that the right printers are added to your device.",
"Username": "Username",
"Password": "Password",
"SignIn": "Sign in and add printers"
}
Comments