Printers disappear after running the Windows Mobility Print installer
Last updated November 22, 2024
“Help! I’m a PaperCut admin, and I don’t see any new printers even after running the Windows Mobility printer installer successfully! What could cause this problem?”
When running the Mobility Print Client on Windows you may see that printers fail to install, although this problem may present slightly differently when running the standard Windows Mobility Print client or the Windows Mobility Cloud Print client.
- If the standard Windows Mobility Print client fails to install printers, it may appear that the installation was successful even though no new print queues show up in Devices & Printers.
- When the Windows Mobility Cloud Print client fails to install printers, it shows this error: “All printers failed to install”.
Frustrating? Absolutely. But don’t worry—there are a few things to check that might uncover the root cause.
Port 9163 isn’t open
The Mobility Print installer connects to the server on port 9164 and 9163. If 9163 is blocked, you may be able to discover printers but the print queue setup will fail. Check your firewall settings to ensure port 9163 is open between the workstation and the Mobility Print server.
One easy way to test this is to open a web browser on the workstation, then try navigating to the admin web interface of the Mobility Print server on port 9163 (example: http://<mobility-print-server-address>:9163).
BitDefender deletes printers on public networks
BitDefender’s Dynamic Mode can remove print queues if the network adapter’s profile is set to Public.
To fix this:
- Open BitDefender and go to Protection > Firewall > Settings.
- On the Network Adapters tab set your network adapter to Home/Office.
- In Settings > Edit stealth settings, toggle the switch for your network adapter to Off and click OK.
- In the Rules tab, click Add Rule.
- Set Apply this rule to all applications to Yes.
- On the Advanced tab, enable Custom remote address and enter the IP address of the device.
- (Optional) Specify the port for the rule, or leave it to apply to all ports.
- Click OK to save your changes.
The Internet Printing client is not installed on the workstation
The Mobility Print client uses IPP to create queues. This feature is usually enabled on desktop versions of Windows but needs to be manually activated on Windows Server editions. If you are printing to Mobility Print from a Windows server, then you might run into this problem. This will result in events 301 or 302 in the Windows Event Logs, and no printer will be added.
To enable the Internet Printing Client:
- Log onto the machine where you are trying to install the Mobility Print queue.
- Open Start > Turn Windows features on or off.
- Expand Print Services, select Internet Printing Client, and click OK.

- Restart the computer.
The print server name or printer’s location field is too long
When the Mobility Print client creates a printer on a user’s workstation, it populates the “internet port” with important information like the address of the server, printer name, printer location, and a connection string. However, Windows has a 255-character limit for internet port names. In some situations the Mobility Print client runs against this limit and Windows deletes the printer with event 301 or 302 in the Print Service Operational log. Check to see if the server name or printer location is excessively long.
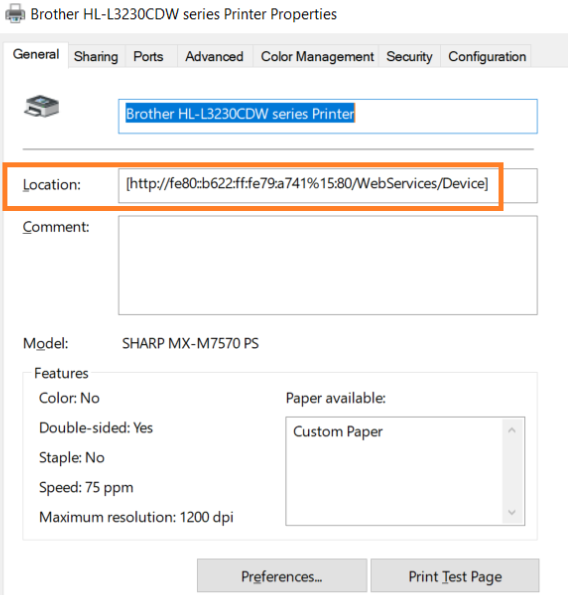
This happens with Brother printers in particular because these print drivers populate the location field with a URL containing a very long IPv6 address. To fix this, open the printer’s Properties, and shorten the Location field. If you encounter this, let us know and cite PD-1252. 
Further Troubleshooting
If the earlier steps don’t solve the issue, try these advanced troubleshooting techniques.
Run the Printer Installation Command
If errors persist, the Windows Mobility Client Logs ( instructions here ) can provide the exact printer installation command. It may look something like this:
rundll32.exe printui.dll,PrintUIEntry /if /b "LaserJet-Color [Library](Mobility)" /x /n "Not used" /m "PaperCut Global PostScript" /r "http://papercut.local:9163/printers/LaserJet-Color/users/fbaggins/6caa66dbb1ef679dd33caa3708870eb1b27569878d28777063808fdd354cc68f" /u /q
To debug the command:
- Check the Windows Mobility Client logs to find the command used to install the printer, it will contain “rundll32.exe printui.dll”.
- Open a Command Prompt on the workstation.
- Run the command without the /q (quiet) flag to display any error messages.
The most common error we’ve seen is “Operation could not be completed (error 0×00000704)”. We haven’t identified all of the reasons why this occurs, but we have seen this happen in a few situations…
- Authenticated proxy or security appliance: Devices between the client and server may block communication.
- Client hostname exceeds 15 characters: Long hostnames can prevent the inetpp.dll from loading after a reboot, causing the Print Spooler to fail. Try restarting the Print Spooler service after a reboot to see if it will load this binary.
- Registry value modified: Software installations might rename a registry value, causing the Internet Print Provider to stop working. Check this registry key:
Computer\HKEY_LOCAL_MACHINE\SYSTEM\CurrentControlSet\Control\Print\Providers\Internet Print Provider\Name. If the value is set to inetpp.dll.INACTIVE, change it back to inetpp.dll then restart the Print Spooler service.
Use Event Viewer to Investigate Printer Deletion
Windows Event Viewer can reveal if another process is deleting the printer:
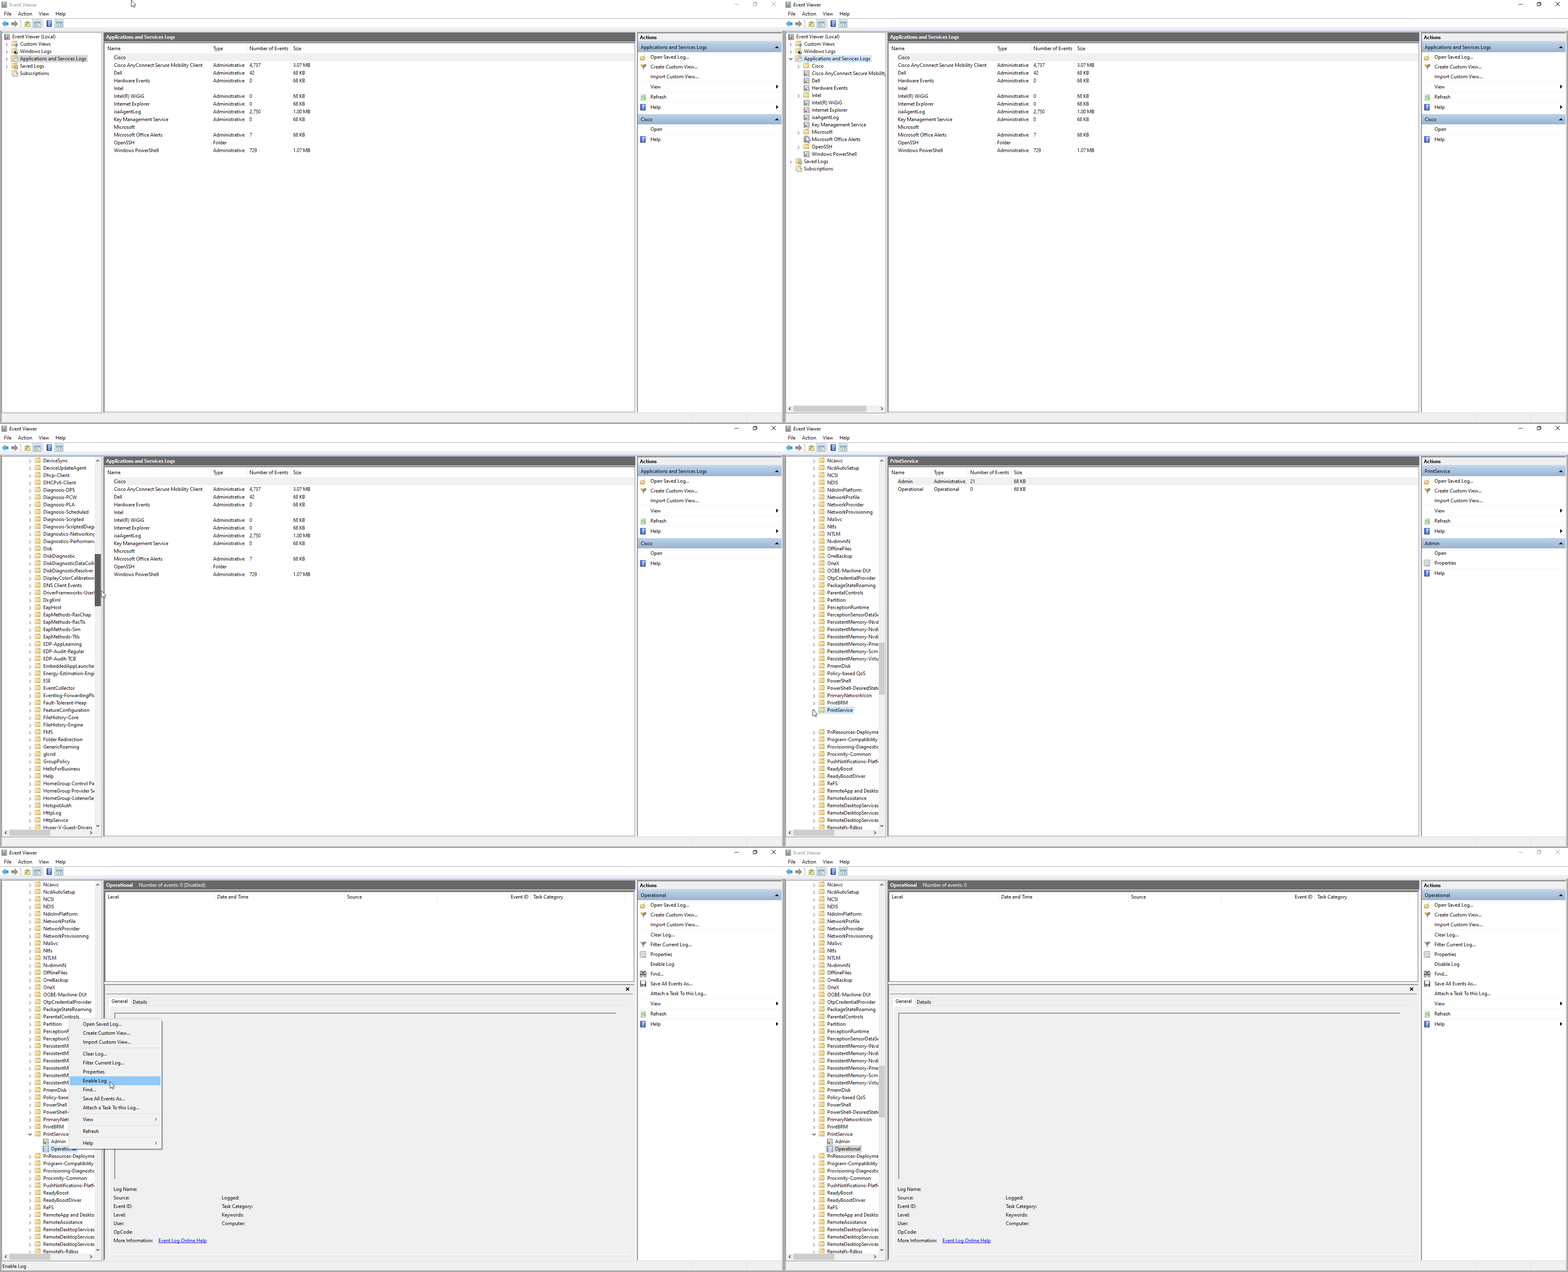
- Open Event Viewer ( instructions here ).
- Navigate to Applications and Services Logs > Microsoft > Windows > PrintService.
- Enable the Operational Log.

- Run the Mobility Print installer again.
- Check the log for errors, particularly event codes 301 or 302.
These events often contain a Process ID (PID). Use the PID to identify the responsible process:
- If the PID belongs to svchost.exe, double-check that the Internet Printing Client is installed.
- If the PID belongs to another app, investigate whether it’s a print management tool or antivirus software causing interference.
Categories: Troubleshooting Articles , Mobility Print
Keywords: disappearing , disappear , windows , chupacabra , 704


Comments