How to save on color toner with PaperCut
Last updated October 29, 2024
Contents
As the administrator of your printing environment, you already know how expensive color printing is. Are you interested in saving money on color toner? Here are a few different ways to encourage people to print smarter and lower their costs both with and without NG/MF. Read on to learn more.
Option A: Set the print queue default to Black and White (Windows Only)
In the world of Windows printing, it is possible to change a print queue so that Black and White is the default choice. The user will still be able to override the option, but you can at least change what the default options will be. This is done through the “Printing Defaults” menu on the print server. For detailed information see Windows Printing Defaults and Printing Preferences .
Summary:
- Windows users will see Black and White as the default option when they try to print but can override this as needed.
- Applicable only with Windows clients and print servers, so this won’t work for Mobility Print or Google Cloud Print users.
- This is not a PaperCut feature, so it doesn’t need PaperCut to work.
Steps:
Log into the print server, and open the Print Management console by pressing Windows key + R, then type printmanagement.msc and hit Enter.
Next, right-click on the printer you want to manage and choose Set Printing Defaults…
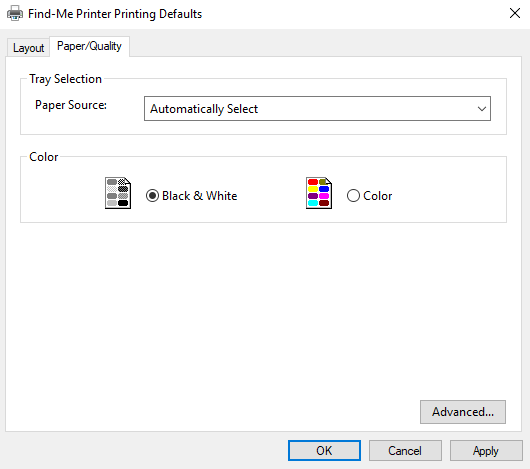
In this menu you should be able to set the default color choice of the print queue to grayscale/mono/black and white. Be aware that this menu might be completely different for each print driver, as this can be customized by the manufacturer. The screenshot below shows how this would look if you were configuring a printer that uses the PaperCut Global PostScript driver.

Option B: Use PaperCut to convert print jobs to Grayscale
Summary:
- PaperCut can be used to convert all print jobs to grayscale automatically for a specific printer or group of users.
- Works with any kind of print server running PaperCut (Windows, Linux, macOS).
- For this to work there are a few prerequisites:
- Make sure that Color Detection is enabled for the printer in PaperCut, which should already be on by default.
- For some print drivers, Advanced Printing Features may need to be disabled.
- Most print drivers should be supported, but check the Supported Printers page to confirm. When in doubt, use a PCL or PostScript driver.
Steps:
Log into the PaperCut Admin interface and open Printers and select a particular printer.
Open the Filters & Restrictions tab and check the box Convert color jobs to grayscale for: all users.
Scroll to the bottom of the page and click Apply.

Option C: Prompt users to confirm color jobs with Print Scripting
If users are running the PaperCut User Client, then it’s possible to use PaperCut’s Print Scripting feature to send users a popup message to ask them if they really want to print in color.
Summary:
- PaperCut can be used to convert all print jobs to grayscale automatically for a specific printer or group of users.
- Can be done with any print server running PaperCut, so long as the user is running the PaperCut User Client on their workstation to see the popup message.
Steps:
- Log into the PaperCut Admin interface, open Printers and select a particular printer.
- Click on the Print Scripting tab.
- Check the box next to Enable Print Script.
- Select Import Recipe.
- Then import the script “Color print jobs require user confirmation”.
Option D: Make Grayscale and Duplex the default option when users ‘release’ jobs (MF Only)
This is an option for PaperCut MF customers only that have PaperCut embedded on their devices, and that are running PaperCut MF version 20.0 and higher. When users sign into a device to release their print jobs, they will see an option to Changing attributes of print jobs at the device, the admin (you) can configure PaperCut so that grayscale and duplex are the default options.
Summary:
- Admins can configure copiers running the PaperCut embedded application so that when users release their print jobs, “grayscale” is selected as the default option.
- This option is only available for PaperCut MF version 20.0 and higher, and only for specific types of devices as mentioned on the requirements page (NOTE* - Kyocera Devices do not currently support this feature).
- Users can still select “color” to override the default.
Steps:
Follow these instructions to enable users to change print settings when releasing jobs at a copier.
While logged into the web interface of the PaperCut server as admin, navigate to Devices and select a particular device.
Select the Advanced Config tab.
Search for the key
ext-device.print-as-grayscale-by-default(also check out the keyext-device.print-as-duplex-by-defaultfor making duplex the default option).Change the value of this config key to Y.
Click Update and then confirm this works as intended by printing a document and releasing it at a device.

Thank you sysadmin Brandon Stadt for providing this screenshot.
Still have questions?
Let us know! We love chatting about what’s going on under the hood. Feel free to leave a comment below or visit our Support Portal for further assistance.
Categories: How-to Articles , Charging and Billing
Keywords: mono , grayscale , greyscale , black and white , black & white , printing preferences , printing defaults , restrict color printing


Comments