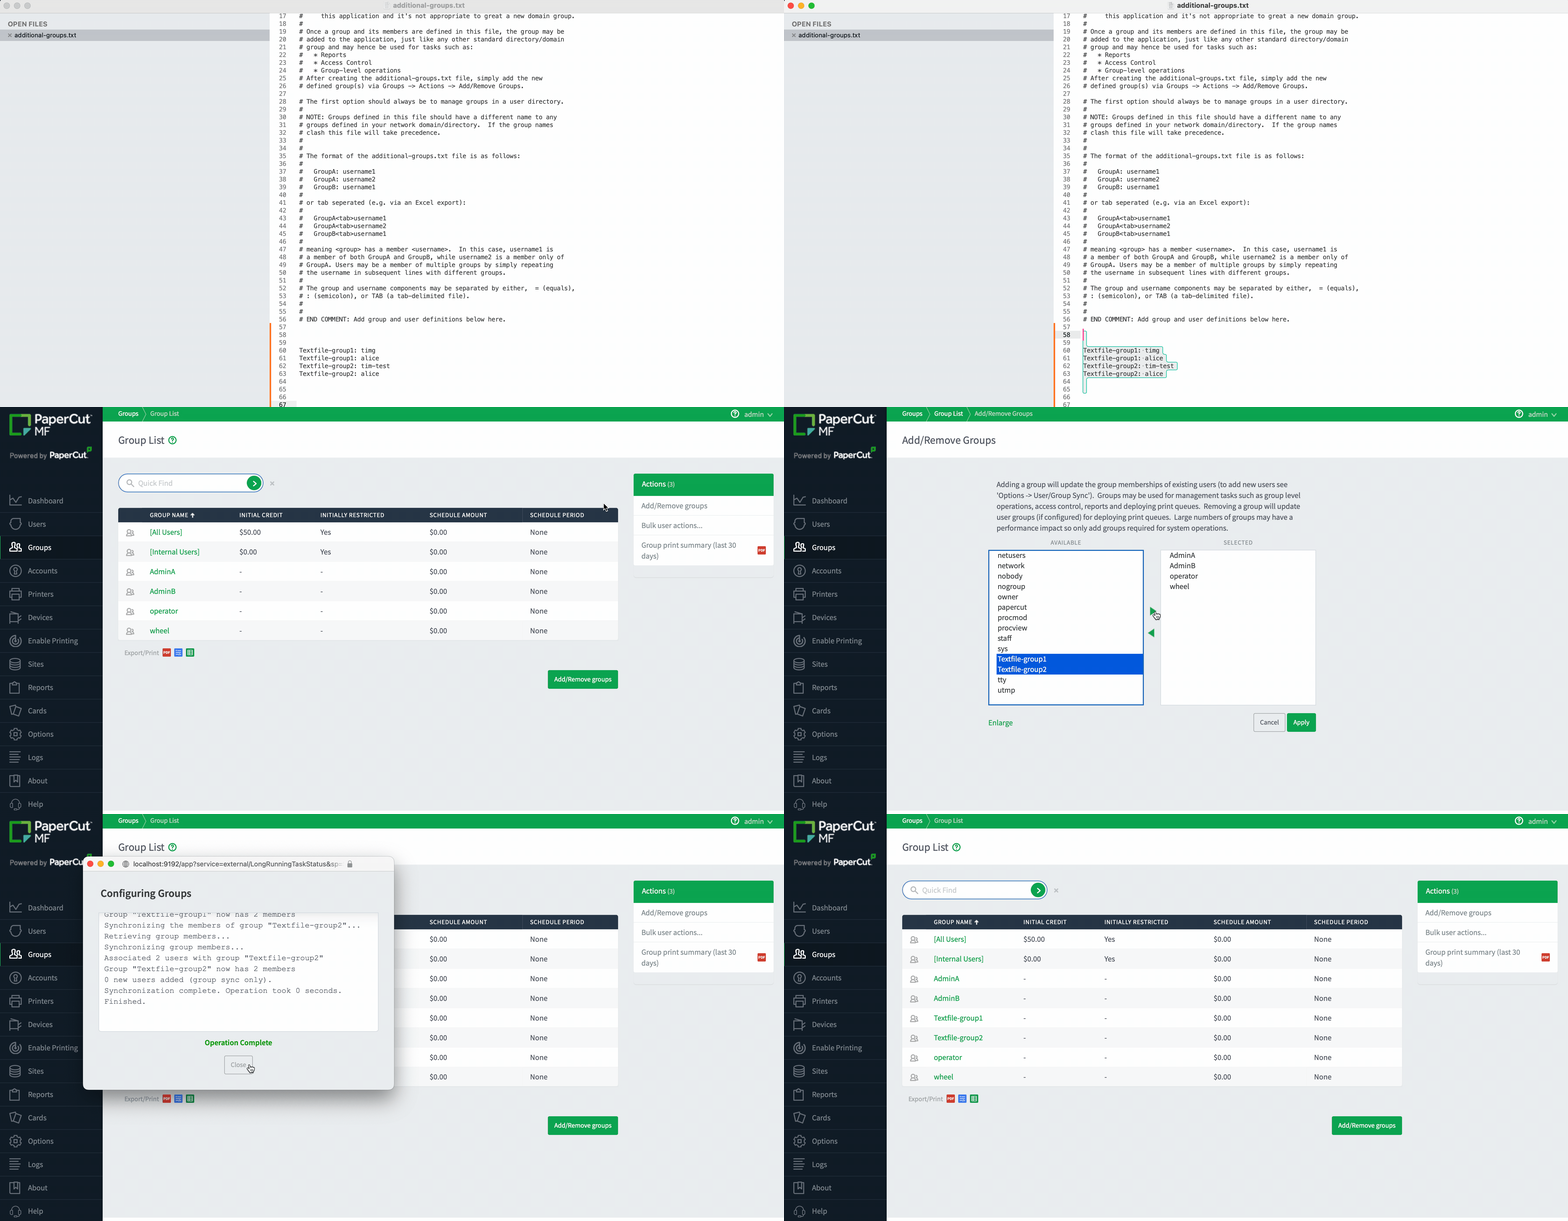
There are some situations where it’s not possible to maintain groups within the network directory source, for example, you might not have read-access to the domain, or you need to create a one-off group only for use in PaperCut NG/MF. If it is not possible to define the required groups using your network directory, you can define them via a text file.
Internal Groups are also called “additional groups” as they are usually defined and used ‘in addition’ to the groups already provided by your domain/directory. Additional groups are defined in a text file and may be composed of users who exist either in the domain or are PaperCut Internal Users.
Creating internal groups and group memberships
There’s an example template and further information in the file called additional-groups.txt.tmpl in [app-path]/server/data/conf/.
On the Application Server file system, go to [app-path]/server/data/conf/
for example C:/Program Files/PaperCut MF/server/data/conf
Open
additional-groups.txt.tmplin a text editor.Update the text file with the
groupname: usernameassociations.The format is a simple list of groups and their associated users, with one group and one user per line. For example:
group-1: johnnie
group-1: kellyschultz
group-2: johnnie
See About the additional-groups.txt file section below for more on the formatting of the text file.
Save the file as
additional-groups.txtin the same folder: [app-path]/server/data/conf/In the PaperCut admin interface, go to Groups > Actions > Add/Remove groups then select your internal groups from the Available list on the left, and move them to the Selected list on the right.
Click Apply.

Animation showing the text file configured with 2 internal groups, then selecting those two groups to show within PaperCut NG/MF
You should then be able to see your internally created groups in the groups list in PaperCut NG/MF, under the Groups tab.
About the additional-groups.txt file
In the additional-groups.txt file, you’ll need to have a username associated with the group for it to show under the Groups tab in the PaperCut Admin console.
The format of additional-groups.txt is a simple list of groups and their associated users, with one group and one user, per line:
  GroupA: username1
  GroupA: username2
  GroupB: username1
  GroupB: username3
… or tab seperated if you prefer (e.g. via an Excel export):
  GroupA<tab>username1
  GroupA<tab>username2
  GroupB<tab>username1
  GroupB<tab>username3
One of the main use cases of using additional/extra groups in this file is to supplement groups in the user directory. In large education environments, getting new groups defined in a central directory server can be difficult - you need to convince the central administrator that the group is required and needs to be maintained. The manual file method allows groups to be created or controlled by a wider range of people without the need to have admin-level access to the central LDAP/AD server.
Some additional discussion can be found in the manual here .
Refreshing your internal group memberships
If you make a change to additional-groups.txt but you’re not seeing the change reflected in the PaperCut MF/NG admin interface, you’ll need to force it to refresh:
In the PaperCut MF/NG admin interface, go to Options > User/Group Sync.
Under the ‘Sync options’ section, click the Synchronize now button.
The user/group sync process will then run, which re-reads the data in the additional-groups.txt file.
Troubleshooting
My internal groups are not showing in the ‘Groups’ tab - why?
Check that the
additional-groups.txtfile has been saved with the correct name.Sometimes the .txt file can be accidentally be renamed to
additional-groups.txt.txt(note the double.txt.txt).Be sure to check the file is correctly named
additional-groups.txt. When renaming the file, at the top of the Windows Explorer window, you can select “View” and tick the checkbox “File name extensions”.Check that the internal groups have been added through Groups > Actions > Add/remove groups - ensure that the groups that you want to manage are listed in the right hand ‘Selected’ column.
Check that a Primary sync source is configured - without this, the additional groups will not be sync’d in.
It’s important to note that the
additional-groups.txtfile will not be read by the Application Server if there is no primary sync source configured in PaperCut.To fix this, in the PaperCut admin interface, navigate to Options > User/Group Sync, if the Primary sync source is undefined/blank, you will not be able to import internal groups. You’ll need to select a sync source (even if it is only the local server source) to be able to see the internal groups defined in the text file.
Check that the
additional-groups.txtfile is in the correct format - see About the additional-groups.txt file
My internal group is showing up, but it doesn’t contain all the users I’ve defined in the text file - why?
Check that all the users defined in the text file exist in PaperCut MF/NG.
If you have defined the following in the
additional-groups.txtfile:group1: bobbyThe user ‘bobby’ needs to exist in PaperCut - if the user doesn’t exist when you search under Users > Search > ‘bobby’ then the user will not be added to ‘group1’. You’ll need to create the user either by Synchronizing with an external user directory or Creating an internal user . Once the user is created in PaperCut MF/NG, the
additional-groups.txtfile can be used to add that user into a specific group.Check that the server has updated the groups based on the latest contents of the text file - see Refreshing your internal group memberships above.


Comments