Best practices for configuring Windows Print Servers
Last updated March 18, 2025
“How should I configure my Windows Print Server to get the most out of PaperCut?”
PaperCut is intended to work ‘out of the box’ in most environments. However, to make sure you get the most out of the application and ensure all of the features work as intended, we’ve put together this guide to showcase some of the most helpful Windows Printing knowledge and experience we’ve gathered over the years.
However, if you’re simply looking for how to set up a printer in Windows then we recommend looking at this article first. If you are looking for specific list on how to set up a Find-Me Print queue then see the article The end-to-end guide on setting up Find-Me Printing instead. Both of those articles have a more straightforward list of steps than this one, whereas this article is more like an annotated guide to Windows Print queue settings.
If you’re already an expert and want to skip the gory details, run through the handy check list below:
Check list
- The Printer Share Name should be shorter than 32 characters.
- The Print Server Name should be 15 characters or less.
- Check that Render print jobs on client computers is enabled.
- Configure printers to use a Standard TCP/IP port.
- Only use the PaperCut TCP/IP Port with the Hardware Page Checks feature.
- Use the nul port for Find-Me print queues.
- Disable Bidirectional Support only when troubleshooting.
- The port protocol should be RAW.
- Use Type-3 PCL or PostScript drivers when available .
- Disable Advanced Printing Features.
- Leave the default permissions on the Security Tab.
- Move the Windows Spool directory to a non-system disk.
- Use the built-in Windows method for hiding document names.
- Set Driver Isolation to ‘Shared’ or ‘Isolated’.
- Disable Printer redirection on your print server, where possible.
How to manage your printers
Print Management Console lets you manage everything about a printer in Windows. The fastest way to open the console is to launch Run by pressing Windows key + R, then type printmanagement.msc and hit Enter. Next, right-click on the printer you want to manage and choose Properties… This will open the Printer Properties dialog with lots of options to configure.
Below is a description of each one of the tabs, as well as our configuration advice.
General Tab
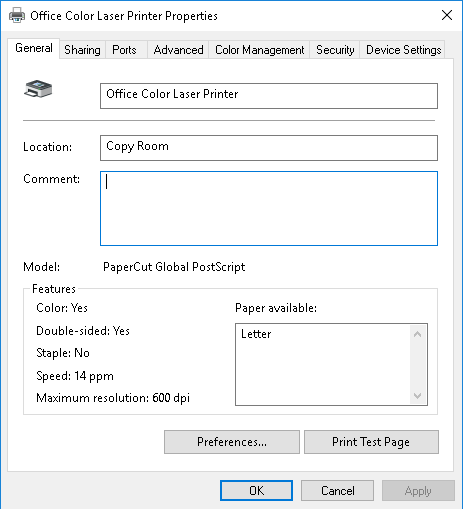
This is where you can configure the printer’s name and location.
- Give your printers a good name. We recommend coming up with an easy to read naming convention that includes the site, make, and model of each printer.
- PaperCut can recognize the Location field which means the attribute is helpful for generating reports. If populated, this field is also used by Mobility Print to tell users where they can find your printer.
- The Print Test Page button is your friend. Use this button to quickly and easily make sure you can send a print job from your server to your device.
Screenshot of the Printer Properties ‘General’ tab:

Sharing Tab
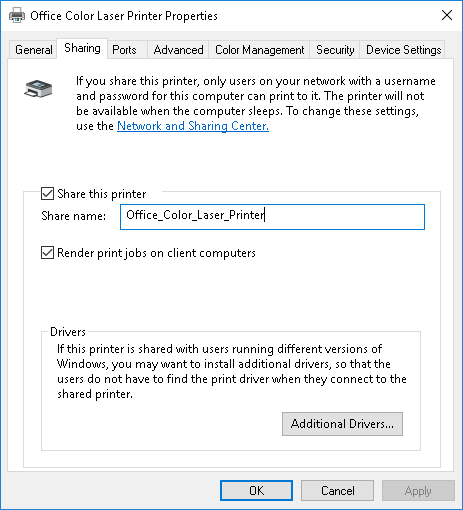
On this tab, you can configure your print server to share the printer, as well as a few other settings.
- Do check Share this printer if you intend to share printer. (It’s okay to leave this unchecked if you will be sharing the print queue using Google Cloud Print, or Mobility Print, or if you only want users to send print jobs to the Find-Me print queue).
- PaperCut will work with long printer names, but according to Microsoft the Printer Share Name should be shorter than 32 characters.
- Its best practice in environments with Macs and LPR printing for the Share Name to not include spaces.
- Make sure to check Render print jobs on client computers. This should be the default anyway, but if this is disabled for whatever reason, it can cause additional load on the server and printing issues from Windows 10 clients.
- Clicking the Additional Drivers… button lets you add drivers for legacy 32-bit systems.
Screenshot of the Printer Properties ‘Sharing’ tab:

Ports Tab
This tab lets an administrator configure which ‘port’ the Windows print queue will use to communicate with the physical printer. Printer ports are different from a firewall port and traditionally referred to physical ports on the computer like COM1 and LPT1, but nowadays this is where you go to specify the IP address of your printer. What sort of port should you use? Well, that depends…
- For most printers, the port should be a Standard TCP/IP Port that points to the IP address of your printer.
- If you are setting up a Find-Me printer, then the port should be set to ‘nul’. No, that’s not a typo.
- The PaperCut TCP/IP Port can also be used, but this is only recommended when doing Hardware Page Checks. By necessity, the PaperCut port will slow down printing as the application waits for the last job to finish printing before analyzing the next one. So if Hardware Page Checks are not needed, then stick with using a Standard TCP/IP Port.
- We don’t recommend WSD ports as this obscures the IP address of the printer, making it difficult for PaperCut to communicate over SNMP to determine toner levels and status.
- The setting Enable bidirectional support may be used so that a print driver can communicate with a physical printer to discover the printer hardware, find out if a finishing unit is attached, or sometimes find out if the printer is in an error state. There are some situations where this setting is helpful, but in our experience this setting can also cause instability or can trigger the ‘sent to printer’ status for jobs in the print queue. If the setting is grayed out, it means it is not applicable to this driver, as is the case with the PaperCut Global PostScript driver.
Screenshot of the Printer Properties ‘Ports’ tab:

Ports Tab > Configure Port…
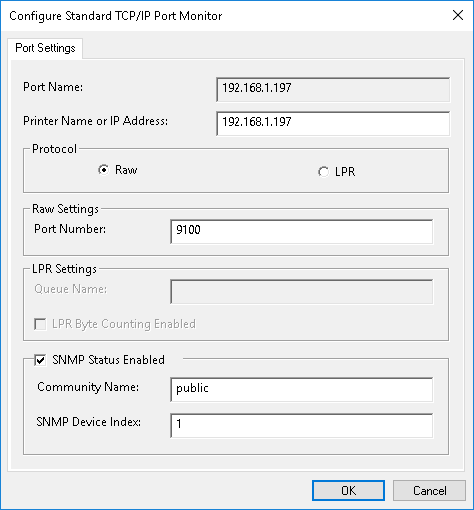
In this section, admins can specify advanced settings for the port. Most of the time this is automatically configured.
- Ideally, the selected Protocol should be RAW. This type of connection is faster than legacy LPR connections and nearly all modern printers support it.
- It’s recommended to check SNMP Status Enabled to let Windows query the printer for current status. The Community Name here and on the printer must match, or Windows will think that the device is offline.
Screenshot of the ‘Configure Port’ tab:

Advanced Tab
In this section, administrators can specify the hours a printer is available, what driver a print queue should use to communicate with the physical printer, as well as configure how documents spool.
- Driver will show the name of the driver configured in Print Management Console. We strongly recommend PostScript or PCL drivers when available. See our article about Supported Printers for more details.
- About the setting Start printing after the last page is spooled, this will be automatically configured by PaperCut to so that the document can be fully analyzed before it is sent to the printer.
- Uncheck Enable Advanced Printing Features to prevent the driver from spooling print jobs in proprietary print languages instead of PCL or PostScript. Disabling this setting ensures that PaperCut can accurately read the spool files of the print job, which in turn enables a number of PaperCut features such as precise page count and color detection, grayscale conversion, and watermarking.
- Note: if you can’t uncheck this box because you need advanced features like finishing options / stapling etc, then we highly recommend forcing Client Side Rendering - see Method B from Render Print Jobs on Client Computers .
- Printing Defaults… lets you set default options for all users like default page size or color preference, whereas Printing Preferences changes the same settings for only the logged-in user. For more information see Windows Printing Defaults and Printing Preferences .
- Starting with PaperCut 19.1.4, if the printer is a Find-Me Printer or Virtual Print queue, we set the Available from to 4:00AM to 4:01AM. This is to help prevent some rare situations where jobs are scheduled to be printed by Windows rather than held by PaperCut as intended.
Screenshot of the Printer Properties ‘Advanced’ tab:

Security Tab
Here is where permissions are set to control which users or groups of users have rights to manage the print queue or documents.
- It’s a good idea to just stick with the default permissions and use PaperCut features to manage printer access as found in Filters & Restrictions.
- This is optional, but for physical print queues you could remove the Manage Documents right for Creator Owner to prevent users from bypassing PaperCut Hold & Release settings. However, don’t worry about this for Find-Me print queues which should point to a nul port anyway. The caveat to this technique is that we’ve seen cases where some manufacturer’s drivers require the Creator Owner permission.
- Another way to prevent users from resuming held print jobs (without modifying permissions) is to use the PaperCut TCP/IP Port. If a user attempts to resume their held job, it will be automatically deleted by PaperCut.
Screenshot of the Printer Properties ‘Security’ tab:

Device Settings Tab
These settings may be unique to the make, model, and driver. It’s also possible that settings here can interfere with PaperCut features. For example, watch out for things like settings to configure the manufacturer’s implementation of Pull/Print among other queue management features.
Screenshot of the Printer Properties ‘Device Settings’ tab:

Other Settings
Keep your Print Server name short and sweet
If your server name is more than 15 characters, the Windows spooler will actually lop off the end of the name to shorten it to 15 characters. This is a longstanding Windows limitation. This can cause problems with PaperCut’s Web Print and Find-Me Printing when attempting to send print jobs to a secondary print server. To avoid any problems, keep it short!
Re-locate the Spool directory
Especially if you have plotters or wide-format printers or CAD-related printing in your environment - they normally mean huge spool files! Move the spool directory so it is not under the default C:/ drive location or it’s own separate partition or HDD. If you have another physical or virtual disk on the system, move spool files to this location so large spool files do not reside on the same disk as the operating system’s page file. Find out more about this here.
Are you trying to ‘hide’ document names in the Windows print queue?
Prior to Windows 2012, the only way to do this was through the PaperCut Print Provider. However if you’re running 2012 or later, take advantage of the built-in OS-level method to Hide Document Names.
Disable printer redirection where possible
Disable printer redirection on any dedicated print server. This will cause a failure in the spooler service when print drivers not written for enterprise environments get installed due to printer redirection. Follow the guidance from Microsoft regarding this configuration on the machine.
Print Deploy
If you need to deploy your print queues, check out Print Deploy! Here is the tour page about it and also the Print Deploy Help Center if you want to learn more about it.
Still have questions?
Let us know! We’re definitely happy to chat about what’s going on under the hood. Feel free to leave a comment below if you have any questions at all or visit our Support Portal for further assistance.
Categories: How-to Articles , Print Queues
Keywords: Forgotten Tasks , hold release , virtual queue , nul , port , sharing , permissions , rights , Windows , initial set up , step , miss , missed , queue resume print , right-click resume , job


Comments