Configuring PaperCut NG/MF to use a proxy
THE PAGE APPLIES TO:
Last updated February 22, 2025
“Help! All our outbound network traffic is funneled through proxy, and we’re having trouble setting up some features. What do we need to know, and how can we configure PaperCut NG/MF to work with our proxy?”
When should you configure PaperCut NG/MF to work with a proxy?
Having trouble getting certain features to work that require a connection to the internet? If your organization uses a proxy, you may need to configure PaperCut NG/MF with the right details first.
These specific PaperCut NG/MF features require an internet connection and may not work properly if outbound network traffic must first pass through a forward proxy:
- Scan to Cloud Storage
- Document Processing (OCR)
- Mobility Print’s Known Host option (to sign the iOS profile)
- Google Cloud Print
- Automatic updates
- Universal Print Connector
Configure a proxy with PaperCut NG/MF
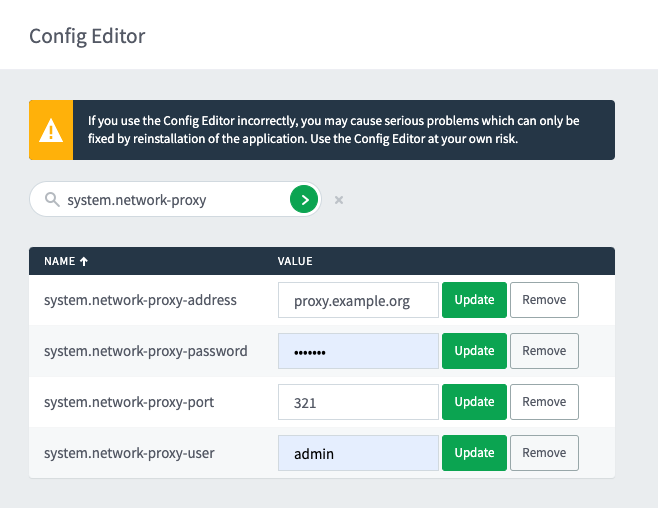
- Log into your PaperCut NG/MF administrator console and open the Advanced Config Editor by browsing to Options → Actions → Advanced Config Editor.
- Search for the config keys containing system.network-proxy.
- Update these Config Keys with the relevant details for your proxy:
system.network-proxy-addresssystem.network-proxy-passwordsystem.network-proxy-portsystem.network-proxy-user
- Once the details are updated, restart the PaperCut NG/MF Application Server service for the changes to take effect.
- If things are still not working at this stage, check our Firewall Ports article to see if there are any ports or URLs that you must whitelist on the proxy to get the specific PaperCut NG/MF feature to work.
Configure a proxy with Universal Print
With the release of Universal Print Connector version 2025-02-17-2017 , you can now configure it to work with a proxy.
Follow these steps to configure the Universal Print Connector to work with a proxy:
- On the PaperCut server where the print queues are hosted, navigate to:
C:/Program Files/PaperCut MF/providers/universal-print/win/. - Using a text editor with local admin rights, open the file
http-proxy.conf - Add a line to include your proxy’s host and port
host:port. Which will look like this:127.0.0.1:8888. Alternate valid configurations include:http://user:password@host:porthttps://user:password@host:portuser:password@host:port
Have multiple PaperCut servers such as Site Servers or Secondary Servers? Keep in mind you’ll need to repeat the above steps on each server where printers are being shared
PaperCut Mobility Print and proxy support
At the moment proxy configurations are not supported with PaperCut Mobility Print. This is not a problem if you are using the mDNS or DNS-SD discovery methods, but is a problem if you are configuring the Known Host discovery method which requires an internet connection to get the latest installers and sign profiles for iOS clients. If this is a requirement for your organization, please reach out to the support team and mention “MOB-1752” which is the code we use to track demand for this feature.
Still have questions?
Let us know! We love chatting about what’s going on under the hood. Feel free to leave a comment below or visit our Support Portal for further assistance.
Categories: How-to Articles , Architecture
Comments