
Contents
- Overview
- What exactly does “Render print jobs on client computers” mean?
- Why enable Client-Side Rendering?
- How do you ensure Client-Side Rendering is enabled?
- Method A: Manually enable Client-Side Rendering
- Method B: Automatically enable Client-Side Rendering with PowerShell
- Method C: Enforce Client-Side Rendering with Group Policy
- Still have questions?
Render Print Jobs on Client Computers
THE PAGE APPLIES TO:
Last updated September 30, 2025
Contents
- Overview
- What exactly does “Render print jobs on client computers” mean?
- Why enable Client-Side Rendering?
- How do you ensure Client-Side Rendering is enabled?
- Method A: Manually enable Client-Side Rendering
- Method B: Automatically enable Client-Side Rendering with PowerShell
- Method C: Enforce Client-Side Rendering with Group Policy
- Still have questions?
- Overview
- What exactly does “Render print jobs on client computers” mean?
- Why enable Client-Side Rendering?
- How do you ensure Client-Side Rendering is enabled?
- Method A: Manually enable Client-Side Rendering
- Method B: Automatically enable Client-Side Rendering with PowerShell
- Method C: Enforce Client-Side Rendering with Group Policy
- Still have questions?
“Help! I’m a print server Administrator and I’ve come across this setting “Render print jobs on client computers”. What does this setting mean, and what’s the best practice when it comes to PaperCut?”
What exactly does “Render print jobs on client computers” mean?
Rendering is the process of converting content that a user wants to print into data for the printer to read. On Windows print servers, the job of rendering can take place on the client (called Client-side rendering) or on the server (called Server-side rendering).
When Client-side rendering (CSR) is used…
- The Windows client renders the document into a format like PostScript before handing the job over to the print server, resulting in less processing load on the server.
- Incidentally these print jobs result in the “RAW” datatype which is easiest for print management software like PaperCut to analyze and interpret.
When Server-side rendering (SSR) is used…
- The Windows client sends the unrendered print data to the server, and the server does the hard work of rendering the print job. This results in considerably more processing load on the print server, particularly in larger environments.
- These print jobs result in spool files with the “Enhanced Metadata Format (EMF)” datatype associated with Advanced Printing Features which is incompatible with some PaperCut features like Page-Level Color Detection and Watermarking.
Why enable Client-Side Rendering?
We like this setting for two main reasons:
- This takes the processing load off of your print server, and prevents your print server from becoming a bottleneck.
- This setting works better with many PaperCut features like because the “RAW” datatype for Windows spool files is easiest to analyze and manipulate.
How do you ensure Client-Side Rendering is enabled?
Below we describe three methods to ensure Client Side Rendering is used. There are slight differences, so read below to figure out which method is best for your organization.
Method A: Manually enable Client-Side Rendering
Client-side Rendering can be turned on for each printer in Print Management Console, and usually it is already on by default.
Steps:
- Open Print Management by pressing Windows key + R, then type printmanagement.msc and hit the enter key.
- Next, right-click on the printer you want to manage and choose Properties…
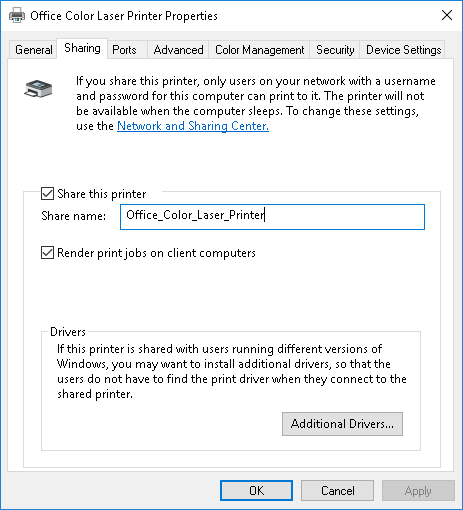
- Select the Sharing tab.
- Make sure Render print jobs on client computers checkbox is enabled as shown in the screenshot.
WARNING: Windows 8 and 10 laptops and tablets (specifically anything with a battery) will ignore this setting and use Server Side Rendering anyway. We think this is silly, but according to Microsoft this behavior is by design to save power. If you have these devices in your network, try using one of other methods to set Client Side Rendering like the PowerShell script.
Method B: Automatically enable Client-Side Rendering with PowerShell
Steps:
- Log into your Windows 2012 or newer print server.
- Open an elevated PowerShell command prompt window.
- Run this command to set the Rendering Mode for all printers to Client-Side Rendering (CSR):
Set-Printer -Name <PrinterName> -RenderingMode CSR. (Pro tip: use the wildcard character * instead of specifying each PrinterName to run this command on all your printers at once!)
Method C: Enforce Client-Side Rendering with Group Policy
Maybe you like the idea of configuring this automatically, but you’re afraid of PowerShell. Lucky for you there’s always more than one way to do something in Windows.
If your workstations are domain-joined, then it’s also possible to manage this setting with Group Policy.
Steps:
- Run gpmc.msc.
- Create a new Group Policy and apply it an OU that contains the client computers.
- Go to Computer Configuration > Administrative Templates > Printers > “Always render print jobs on server” > Edit.
- Select Disabled, then click OK.
Still have questions?
Check out this article with our Best practices for setting up Windows print servers for PaperCut. Also, we love chatting about what’s going on under the hood. Feel free to leave a comment below or visit our Support Portal for further assistance.
Category: Troubleshooting Articles
Subcategory: Print Jobs
Keywords: CSR,SSR
Comments