Contents
Windows Printing Defaults and Printing Preferences
Last updated September 29, 2025
Contents
Configuring Printing Defaults and Printing Preferences on your Windows print server can be a quick win for smarter printing! Set options like grayscale or duplex as the default to encourage eco-friendly choices or create specialized print queues for PaperCut features like Web Print, Email to Print, or Mobility Print.
Understanding Printing Defaults and Printing Preferences
When managing print settings on a Windows server, Printing Defaults and Printing Preferences each serve a distinct purpose. The menu options look nearly identical, but knowing the difference ensures you’re setting options like grayscale or duplex where they’ll be most effective—whether that’s for all users or just for one.
Printing Defaults | Printing Preferences |
|---|---|
|
|
Set Printing Defaults in Windows (for admins)
These are the global/system defaults and will apply whenever a user adds this shared Windows printer.
- In the Windows search bar type printmanagement.msc and click enter. (On older versions click the Start button to make the search bar appear).
- Right-click on your printer and select Printer Properties. This opens the Printer Properties sheet.
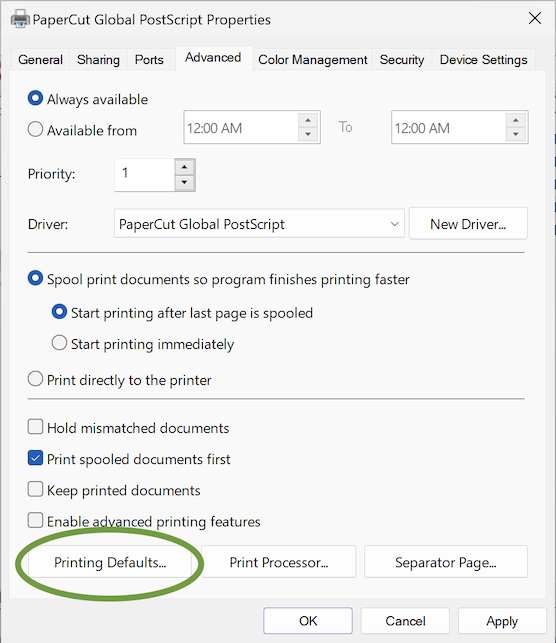
- Go to the Advanced tab and click Printing Defaults.

- Configure your default print settings as needed and click Apply when done. Be aware that the options in this menu will be different depending the print driver.
Set Printing Preferences in Windows (for users)
- Click on the Windows icon to open the Start menu.
- Go to Settings > Bluetooth & devices > Printers & scanners.
- Select the printer you want to customize, then click Printer properties.
- On the General tab click Preferences…

- Adjust print settings like duplex, grayscale, or other options, then click OK to save changes.
Category: Reference Articles
Subcategory: Print Queues


Comments