🔎 Admin console: Easy Print & Scan
Before you start
It’s assumed that the correct country is displayed in the Regional Settings, Country dropdown. The country determines the local formatting attributes, some of which you can customize and some you can’t.
Customizable attributes - for the format of prices:
- End-user language
- Currency symbol and position
- Currency decimal places
Non-customizable attributes - backend settings:
- Default list of paper sizes
- Decimal separator and thousand separator
For more information, take a look at the Regional settings section of this manual.
This page describes all the procedures for Cost Tracking. If you’re after an overview of this feature, take a look at About Cost Tracking .
Configuring the default cost profile
PaperCut Hive and Pocket ask you to do this when you set up Cost Tracking for the first time, but you can also update the defaults at any time after that. To find out more about the default cost profile, see Cost profiles overview .
- In the admin console, select Easy Print & Scan > Cost Tracking. The Cost Tracking page is displayed. You’ll see a first-time welcome screen with an explanation of the feature.
- Click Create default cost profile. The Default cost profile page is displayed and all of your printers are automatically assigned to the default profile.
- If you don’t want to use the default cost profile for all of your printers:
Click Manage printers. A popup displays a list of all of your printers.
Clear the checkbox for the printer(s) you do not want to assign the cost profile to, then click Continue.
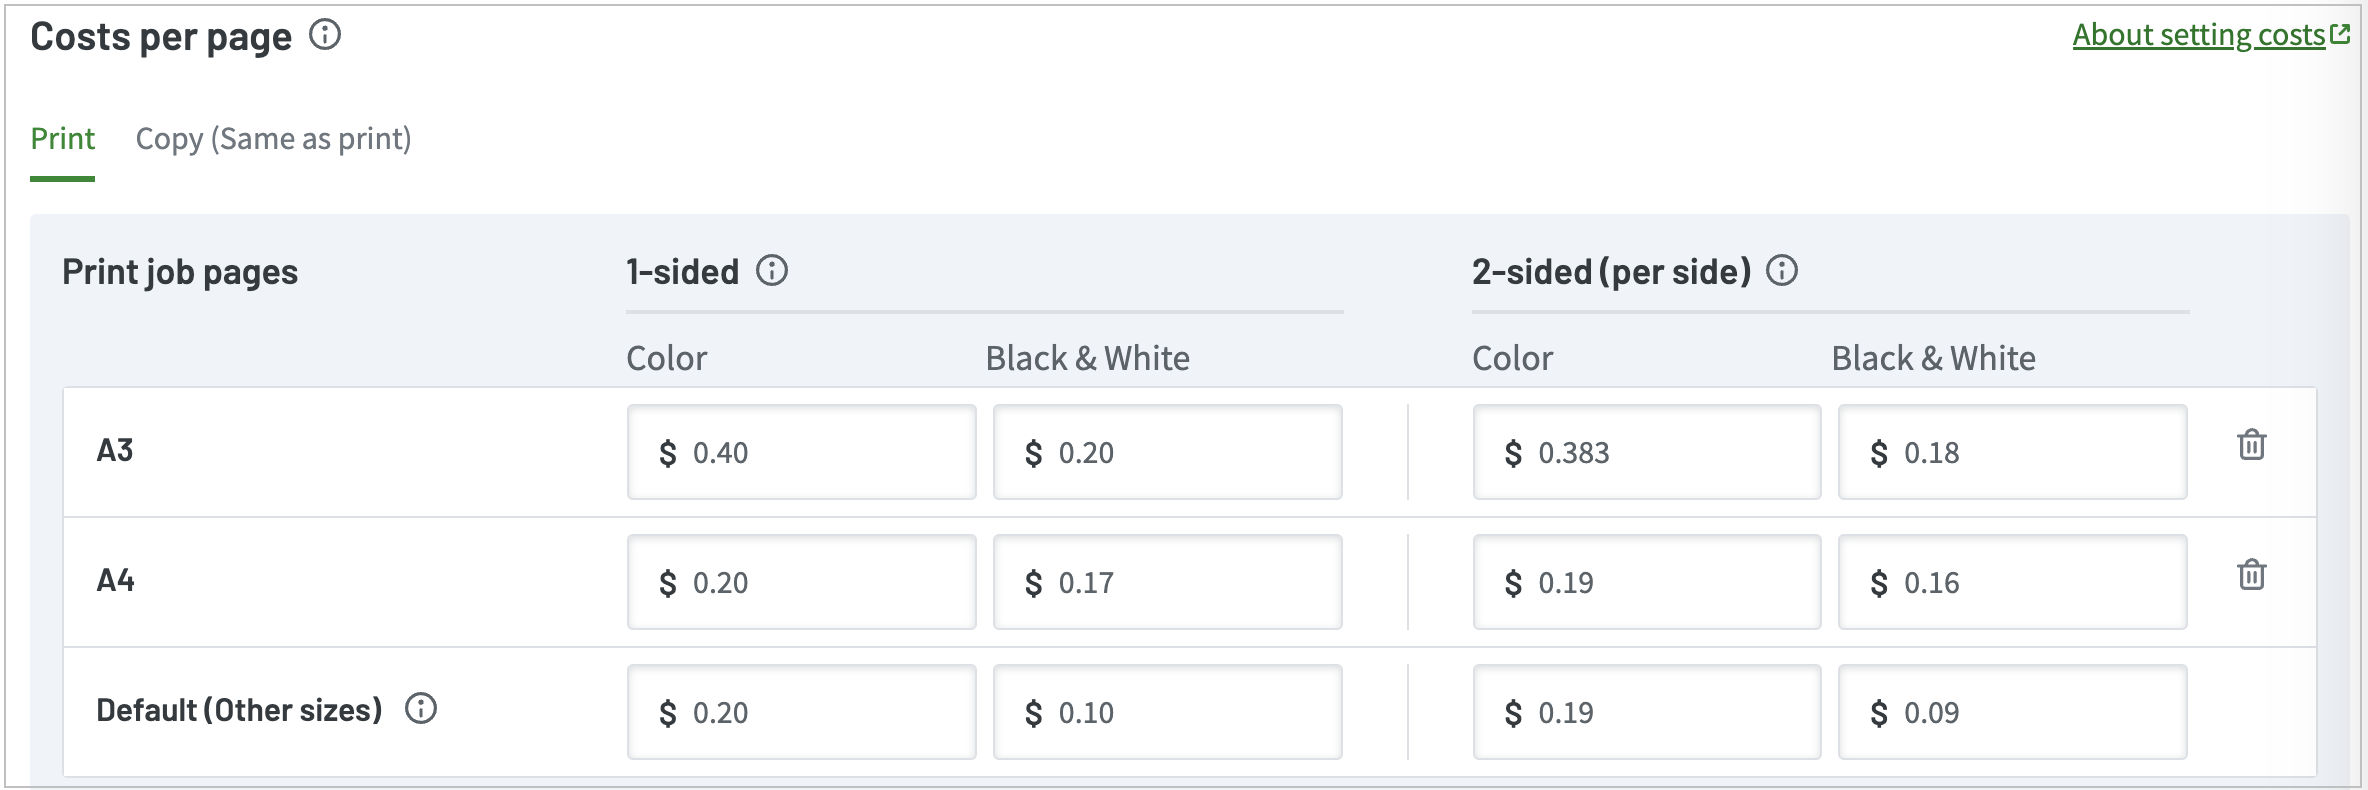
- In the Costs per page section, check the costs for each print job page size, and if required, update the rates in the related fields.

- If any of the printer(s) assigned to this cost profile also use other paper sizes, click Add paper size and enter the rates.
- If the printer(s) don’t use a particular default paper size, click the paper size’s trash can icon.
- If you want to have different rates for copy jobs:
- Select the Copy (Same as print) tab, then click the Same as print toggle to off (turns gray). The Copy job pages section is displayed.
- Enter the costs for copy jobs.
- Click Save changes. A message is displayed explaining the changes will apply to all future jobs for the printers assigned to this profile.
- Click Apply. The cost per page rates will be used to calculate all future print and copy jobs in your organization.
Creating additional cost profiles
When you create an additional cost profile, you can assign printers to it immediately or at a later time. To find out more about cost profiles, see Cost profiles overview .
- In the admin console, select Easy Print & Scan > Cost Tracking. The Cost Tracking page is displayed.
- Click Create cost profile. A popup is displayed to enter the profile’s name.
- Enter a name for the cost profile, then click Create. The next page displays example costs per page. The format depends on the country shown in the Regional Settings.
- Do you know which printers to assign the additional cost profile to?
Yes: Click Manage printers. Select which printer(s) you want to assign to the cost profile, then click Continue.
No: That’s OK; you can assign it to printers later.
- Enter the costs for each page size in the related fields.
- If the printer(s) you’ve assigned this cost profile to can cater for other paper sizes, click Add paper size and enter the costs.
- If you want to have different rates for copy jobs:
- Select the Copy (Same as print) tab, then click the Same as print toggle to off (turns gray). The Copy job pages section is displayed.
- Enter the costs for copy jobs.
- Click Save changes. A message is displayed explaining the changes will apply to all future jobs for the printers assigned to this profile.
- Click Apply.
Setting up custom costs for copy jobs
You can set up costs per page to be different for print and copy jobs. Read all about it in Custom costs per page for copy jobs .
- In the admin console, select Easy Print & Scan > Cost Tracking. The Cost Tracking page is displayed.
- Select the cost profile you want to update. In the Costs per page section, there are two tabs: Print and Copy (Same as print).

- Click Copy (Same as print), then click the Same as print toggle to off (turns gray). The Costs per page section is displayed.
- Enter the costs for copy jobs, then click Save changes. A message is displayed explaining the changes will apply to all future jobs for the printers assigned to this profile.
- Click Apply.
Managing which printers use which cost profiles
This procedure assumes you’ve already created additional cost profiles .
Whether you think of it as printers using a cost profile, or a cost profile being assigned to printers—either way, when there are multiple cost profiles you can change which printers use which profiles. You can also configure printers to not be assigned to any cost profile.
In the PaperCut Hive or Pocket admin console, go to Easy Print & Scan > Cost Tracking. The Cost Tracking page is displayed showing a list of cost profiles.
Select the cost profile name, then select Manage Printers. The Manage printers using <cost profile name> cost profile popup is displayed.
Find the printer(s) you want to assign/unassign the cost profile to/from.
Select and/or clear the checkboxes for the printers, then select Continue.
Click Save changes. A message is displayed telling you how many printers the cost profile will apply to for future jobs.
Click Apply. All future print and copy jobs done on the printer(s) you assigned to the cost profile will have their cost calculated with the CPPs according to that cost profile.


Comments