Setting the local language
PaperCut Hive and Pocket automatically detect the country based on the IP address of the first administrator who logs in to the admin console.
The country presets the attributes in Regional Settings, such as the language shown on the printer’s touchscreen, currency symbol, and number formatting. For all the details about how this works, see Regional Settings .
If you want to change English to your preferred language:
- Log in to the PaperCut Hive admin console.
- Click the avatar on the top-right of the admin console, then click Settings.
- In the Organization tab, go to the Regional Settings section.
- Next to End user language select the language in the dropdown list to the one you want to use.
- Click Save.
Setting the local language for printer/MFD touchscreens, messages, and user emails
You can select which language that all your embedded apps use to display content on your printer or multifunction device (MFD) touchscreens. The same language will also be used for the default content that PaperCut provides for various messages on the display and emails sent to users.
The language you select will be applied to all embedded apps and display only PaperCut Hive screens. For all screens to display in the local language on the device, you’ll need to change the device’s native language.
For a complete localization experience for your users, we recommend setting the same local language on their computers.
Hive only - Applying a local language to already-installed embedded apps
Changing the language in the PaperCut Hive admin console immediately affects the existing embedded app sessions for all equipment manufacturers. You don’t need to re-install the embedded apps. Everything on the touchscreen will be displayed in the local language.
Hive only - Applying a local language to new installs of embedded apps
After you change the language in the PaperCut Hive console, whenever you install and link a new embedded app on an MFD, the selected language will be shown on the device’s touchscreen, starting from the ‘Linking successful’ screen and every screen after that.
Localizing the language for printing rules messages
You can configure various printing rules, for example, you can encourage or enforce users to print 2-sided and/or in black and white. You can also set up safety net rules to catch unusual printing events, like very large print jobs or duplicate print jobs.
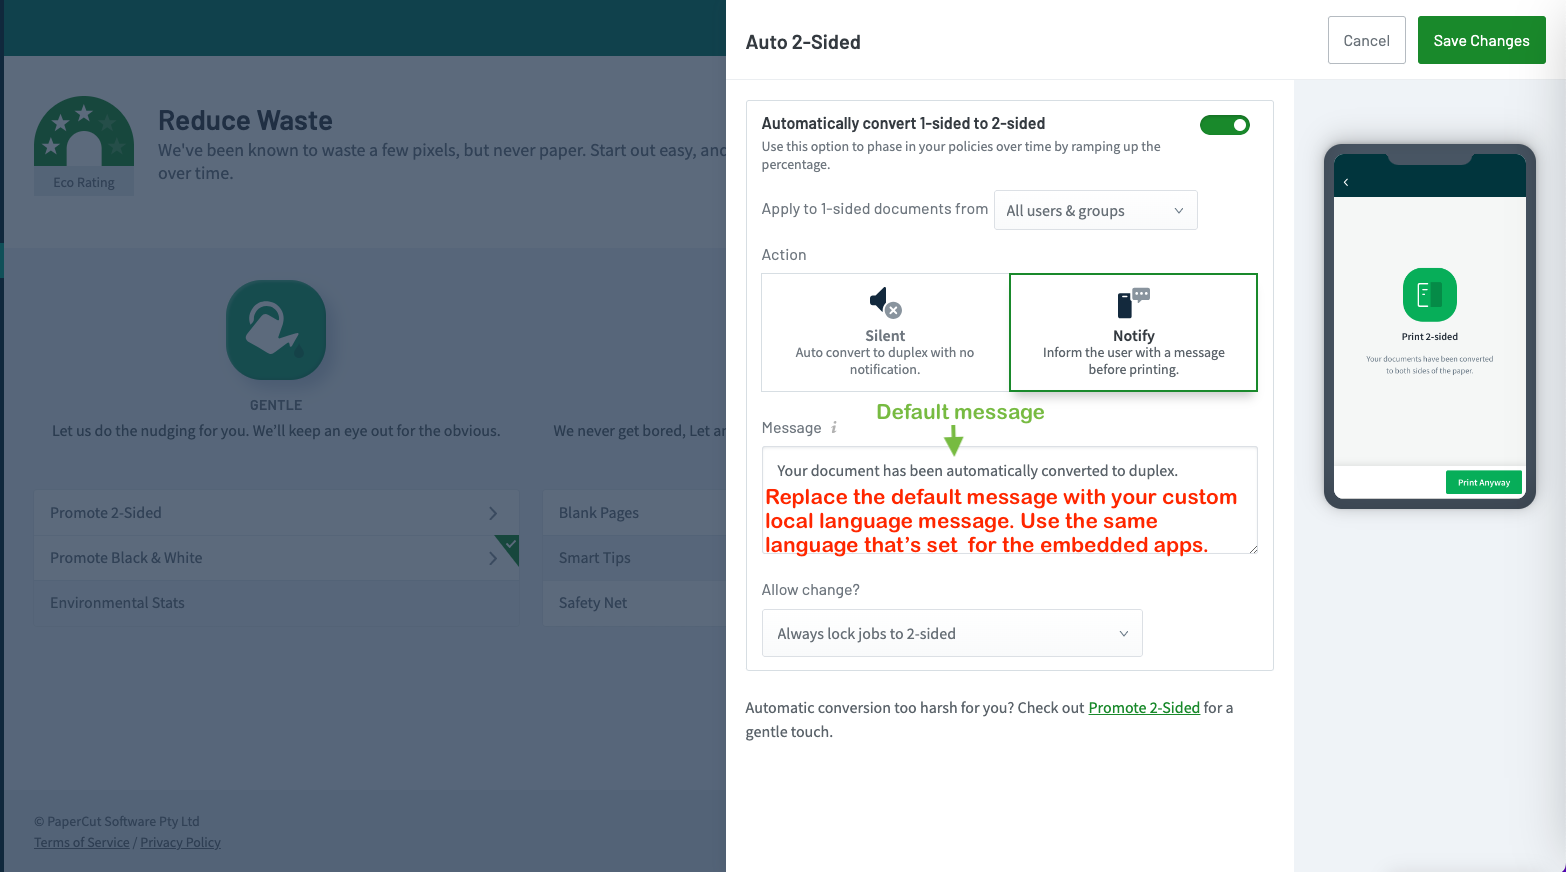
The configurations can include displaying a message about the rules on the embedded’s touchscreen. When a condition triggers a printing rule, the default message is displayed in the local language.
Here’s an example of the English version of a message for automatic 2-sided printing. On the MFD it will show in the local language. If you want to create a custom message, you need to type the custom message in the local language.

Localizing the language for end-user emails
There are two types of end-user emails:
- the initial user invite to use PaperCut
- the scan delivery email.
You can use the default messages or set up a custom message for both.
To create a custom invite email message in the local language:
- Go to Easy print and scan > New user > Welcome message.
- Type the custom message in the local language.
To create a custom scan delivery email:
- Go to Easy print and scan > Integrated scanning and select the applicable Quick Scan. The Edit Scan Action page is displayed.
- Scroll down to the Message section and type the custom message in the local language.
Localizing the language for Safety Net options
The Safety Net feature lets you set up other methods for saving paper and ink. For example, you can warn users about printing duplicate documents or ask them if they really meant to print such a large number of pages.
All of the Safety Net features have a default message that’s in English. If you want to display the message in the local language:
- Go to Reduce Waste > Safety Net.
- Find the message you want to localize.
- Delete the English message and type your message in the local language.

- Click Save Changes.


Comments