About User Invite settings
User Invite settings apply to an entire organization. They work in parallel with your user management and user authentication choices, and allow you to customize your users’ invitation and onboarding experience in PaperCut Hive and Pocket.
Before you choose your user invite settings, it’s important to think about how you want to add users into PaperCut Hive or Pocket. Some questions to consider include:
- Will you be automatically syncing users from an external sync source (for example, an identity provider like Microsoft Entra ID or Google Workspace)?
- Will you be manually adding users on a one-time or ad-hoc basis?
- Do you want your users to manage their own printing software, or will you be managing it for them?
- What’s your expected ratio of permanent users versus guest users?
- Do you want your users releasing print jobs with mobile apps?
- Do you want your users to be able to request access to PaperCut Hive or Pocket? Or do you want full control, and only allow pre-approved users?
- Does your organization use email to communicate with your users? Or is a messaging app more your style?
When you have a clear idea of what your initial setup needs to support, it’s time to customize the Easy Print & Scan > User Invites settings.
Sending email invitations to automatically-added users
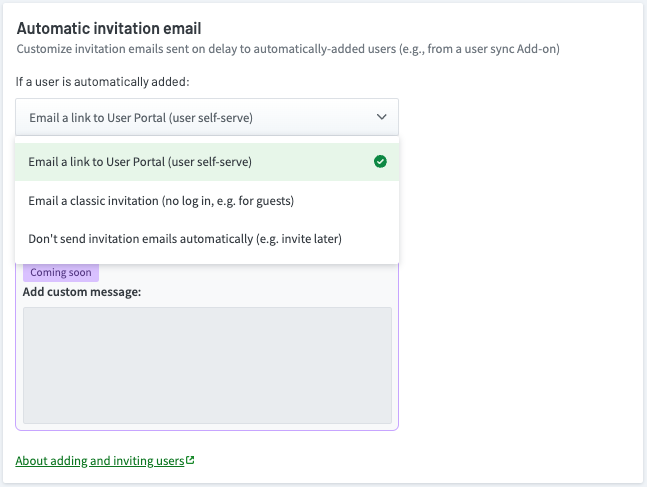
After a user is automatically added into PaperCut Hive or Pocket, the Automatic invitation email setting controls what happens next.

You can choose to:
- send users an email with a link to the User Portal (user self-serve; log in required)
- send users a classic invitation email (no log in)
- not send users anything at all.
The choice between User Portal and classic invitation emails depends on how you’ve decided to run your organization, that is, whether you want your users to self-serve their print setup (for example, client software downloads) and management or not.
If you send emails to your users automatically, it’s important to know that there’s a delay between a user appearing in the PaperCut Hive or Pocket Users list, and the email being sent. This allows for the new user’s inbox to be set up before the invitation email is sent to it.
Manually send invitations later to automatically-added users
You can also choose to not automatically send an email to users after they’ve been added to PaperCut Hive or Pocket. For example, in these scenarios:
- You’re still setting up your print environment, but syncing users early.
- You run a full device management software system, and bulk deploy the user client, therefore users will use “Authenticate on Print” to link the computer app to their user.
- You want to send a self-created email, with your own customization and instructions. In this scenario you can send the share link to the User Portal (see below).
In these situations, it might make more sense to either invite your users later (once you’re ready for them to start printing), or even not send an invitation at all.
Ways to invite users later include via email and via the User Portal.
Via email
- In Users, filter users by Invitation not sent status, select all filtered users, then send email invitations.
- In Users, select specific users, then send email invitations.
Via the User Portal URL
- In Users > Add users > Share link, copy the link, and share it with your users, for example, via messaging app or by linking the URL in your internal onboarding documentation (User Portal only).
- In User Access settings > User Portal, copy the link, and share it with your users, for example, via messaging app or by linking the URL in your internal onboarding documentation (User Portal only).
Changing the default email for manually-added users
If you’re adding and inviting users manually via Users > Add Users, this one’s for you. The Default manual invitation email setting allows you to specify a default email that is sent to manually-added users. Just select between User Portal and classic invitation.
If your organization is a bit more complex (for example, a mixture of permanent employees and guests/contractors) and you want to send them different invitation types, you can always customize the invitation email type and content while manually adding new users.
Overview of all invitation methods in PaperCut Hive and Pocket
You can use multiple methods to invite users to PaperCut Hive and Pocket. Here’s a quick guide to which invitation setting (customizable in Easy Print & Scan > User Invites) applies to each invitation method.
Invitation method | Applicable setting |
|---|---|
Synced from a user sync Add-on | Automatic invitation email |
Users > Add users | Manual invitation email* |
Users > Reinvite (individual user) | Manual invitation email* |
Users > Actions > Send invite email | Manual invitation email |
Users > Bulk management > Import user data CSV | Manual invitation email |
Team Signup > Users > Access Requested > Send invite email (individual user) | Manual invitation email* |
Team Signup > Users > Access Requested > Actions > Send invite email | Manual invitation email |
Team Signup > Auto approve | Manual invitation email |
* Can be overridden at time of invite


Comments