Where is the “Fingerprint” of my server?
Last updated September 30, 2025
You’ve probably encountered us talking about a server’s fingerprint more than a few times. Ever wonder where to get it? Me too, so I made a point of finding out.
Basically, the fingerprint is a unique grouping of characters derived from the certificate the server is using and should be unique for every certificate. PaperCut NG/MF uses this certificate identifier to allow us to communicate via SSL to any device that supports it.
SHA-1 — This is an older encryption method that has been deprecated. It is characterized by a 40-character string. Some legacy devices might still require this key.
SHA-256 — This is considered very secure and has replaced SHA-1. It is characterized by a 64-character string.
Finding the SHA-256 fingerprint
I’ll use a Chromium browser to show how easy it is to find the fingerprint for your PaperCut server and copy it.
PaperCut installs a ‘self-signed’ certificate by default. Some browsers might show a warning, and this is expected, as they typically look for a certificate that’s verified through a trusted Certificate Authority (CA). Since a self-signed certificate doesn’t come from a recognized CA, it doesn’t meet that requirement.
You can import your own trusted certificate into PaperCut quite easily. Take a look at Installing an SSL Certificate the easy way .
Right, let’s get started then.
- Open a connection to your PaperCut server.
https://[server name or IP]:9191/admin - If your browser warns you about the site not being safe (as explained above), click Advanced, then Proceed to site to continue.
You should arrive at the screen below.

- Click the padlock symbol.
- Click connection status.

- Select the certificate.

- Copy the thumbprint. A new window is displayed showing the certificate details.

The SHA-1 can also be found here, but you’ll need to download the certificate, as shown in the recording below.

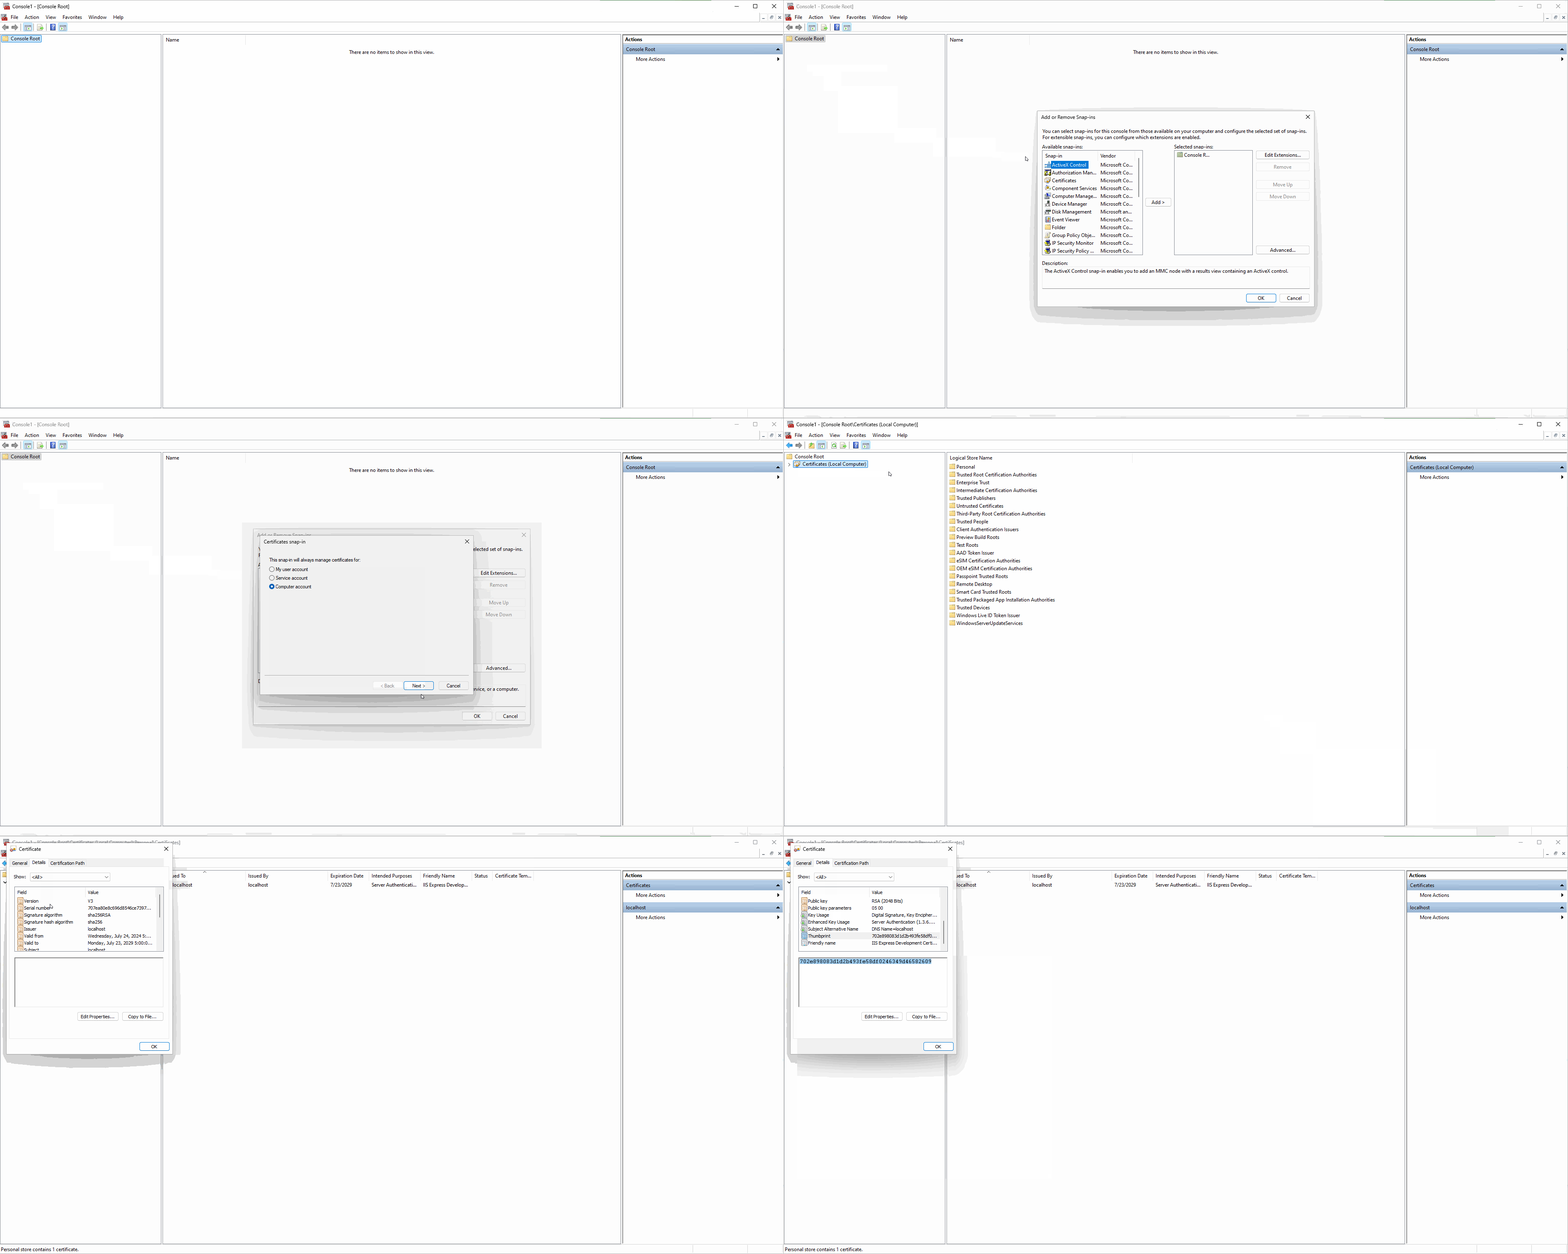
Finding the SHA-1 fingerprint in the MMC
- Open MMC by pressing Win + R, type
mmc, and press Enter. - Add Certificates Snap-in:
- In the MMC console, go to File > Add/Remove Snap-in….
- Select Certificates and click Add.
- Choose Computer account (as the PaperCut server certificate is usually in the computer’s store), then click Next.
- Select Local computer and click Finish.
- Click OK to close the Add/Remove Snap-in dialog.
- Navigate to the Certificate Store:
- In the left-hand pane of MMC, expand Certificates (Local Computer).
- Look for the certificate under the Personal > Certificates store. Your PaperCut server’s certificate will be here. (It might be named after your server or “PaperCut NG/MF”.)
- Find and copy the thumbprint:
- Double-click on your PaperCut server’s SSL certificate.
- Go to the Details tab.
- Scroll down the list of fields until you find “Thumbprint”.
- Select Thumbprint. The SHA-1 thumbprint should be displayed in the lower pane.
- Crucially, this will usually be the SHA-1 thumbprint. Copy the value.

Category: How-to Articles
Subcategory: Administration
Keywords: Fingerprint, Thumbprint, SSL, Chrome, Certificate


Comments